I've started a new series of Maya tutorials on YouTube. I'm not sure how long it'll last, but the first two installments are about using Molecular Maya to work with macromolecular structures.
The first deals with the challenge of importing very large molecular weight structures.
The second is more visually interesting, because we get to render some beautiful atoms.
The main problem I anticipate will prevent me from continuing this series is the fact that I have a NEW JOB! That's right, I will soon be leaving the academic world for the first time since I was a wee tot, and entering the... industry sector? That doesn't quite sound like the right term, but in any case, I will be joining the fine AXS studio. I may have mentioned them quite a while ago on this same blog. I will be employed as a 3D Biomedical Technical Artist, which means I'll get to work in Maya on the things I most enjoy creating.
So how might this prevent future tutorials? Well, so far I've used an educational license for tutorials that I've had access to through my institutional affiliation. But after I leave, I expect I will occasionally get a monthly license for freelance jobs, but mostly I may not have Maya at home. Which is very sad. Maybe an anonymous benefactor could finance a continued subscription for my home use. Anyone?
This also reminds me that I should post some of the freelance work that I've done over the past year. How remiss of me.
Thanks for reading (and watching),
Stuart

Showing posts with label Tutorial. Show all posts
Showing posts with label Tutorial. Show all posts
Tuesday, August 23, 2016

Thursday, October 8, 2015
Intro to Maya - More Screencasts
Four weeks into the course and there are literally hours of Maya training on YouTube now.
Here's a few of the tutorials:
Thanks for visiting,
Stuart
Here's a few of the tutorials:
Thanks for visiting,
Stuart
Thursday, September 17, 2015
Intro to Maya - Course Screencasts
This week I started teaching a Maya course, like the one I taught this past winter, except this is part one of the two. So here we're starting at the very beginning, opening Maya for the first time together.
After this class, the sessions will be much more biomedically focused. I generally start with some concepts, what I call "fiddling with primitives" and then move onto a step-by-step tutorial to create something. I won't post the videos here every week, so subscribe to my YouTube channel to see the latest as the come up each week.
Thanks for visiting,
Stuart
After this class, the sessions will be much more biomedically focused. I generally start with some concepts, what I call "fiddling with primitives" and then move onto a step-by-step tutorial to create something. I won't post the videos here every week, so subscribe to my YouTube channel to see the latest as the come up each week.
Thanks for visiting,
Stuart
Saturday, August 22, 2015
Wireframe Contour Rendering with Maya 2016 and mental ray
Rendering a contour image in mental ray for Maya has been a nice way to show wireframes on an object. In Maya 2016 the usual method has become somewhat hidden, so I thought I would post a brief update on how to do that.
1) Create a black surface shader and apply it to your geometry
2) In the hypershade, access the shading group (e.g. surfaceShader1SG) and open the mental ray tab in the Attribute Editor (or Hypershade property editor!)
3) Under Contours, check Enable Contour Rendering and adjust the other options as you like
4) In the render settings, make sure mental ray is selected, and go to the Configuration tab
5) Check "Show Advanced Settings" and find the Contours section at the bottom
6) Check "Enable Contour Rendering" and increase the Over-Sample to something like 3
7) Under the "Draw By Property Difference" section, check "Around all poly faces"
Not quite done... you might see a Warning: Contour Rendering is not supported with Unified sampling
8) Go to the Quality tab and check "Show Advanced Settings"
9) Expand the Legacy Options section at the bottom and choose Sampling Mode: Legacy Sampling Mode
Hit render! *phew*

Note that if you are rendering beauty passes or other things, you probably want to use the original Unified Sampling and just create layer overrides for the contour settings. Also make sure that you have unchecked both "Around all poly faces" and "Enable Contour Rendering" for these non-contour passes/layers/renders, because I have had the filter settings be set to Box (1, 1) in the background without my knowledge due to "incompatibility with contour rendering". Just something to be cautious about; not sure if they may have fixed that in this version.
Thanks for reading,
Stuart
1) Create a black surface shader and apply it to your geometry
2) In the hypershade, access the shading group (e.g. surfaceShader1SG) and open the mental ray tab in the Attribute Editor (or Hypershade property editor!)
3) Under Contours, check Enable Contour Rendering and adjust the other options as you like
4) In the render settings, make sure mental ray is selected, and go to the Configuration tab
5) Check "Show Advanced Settings" and find the Contours section at the bottom
6) Check "Enable Contour Rendering" and increase the Over-Sample to something like 3
7) Under the "Draw By Property Difference" section, check "Around all poly faces"
Not quite done... you might see a Warning: Contour Rendering is not supported with Unified sampling
8) Go to the Quality tab and check "Show Advanced Settings"
9) Expand the Legacy Options section at the bottom and choose Sampling Mode: Legacy Sampling Mode
Hit render! *phew*

Note that if you are rendering beauty passes or other things, you probably want to use the original Unified Sampling and just create layer overrides for the contour settings. Also make sure that you have unchecked both "Around all poly faces" and "Enable Contour Rendering" for these non-contour passes/layers/renders, because I have had the filter settings be set to Box (1, 1) in the background without my knowledge due to "incompatibility with contour rendering". Just something to be cautious about; not sure if they may have fixed that in this version.
Thanks for reading,
Stuart
Sunday, July 19, 2015
Maya Course - 10 videos so far
So far I've uploaded 10 videos from the Maya course I taught this spring. If you're interested in learning a variety of Maya topics, I highly recommend subscribing as I upload the remainder of the course. A few selected vids:
A shorter segment on animating cameras in Maya
A fun overview of how driven keys can be helpful in rigging
And an introduction to the MEL scripting language
Later,
Stuart
A shorter segment on animating cameras in Maya
A fun overview of how driven keys can be helpful in rigging
And an introduction to the MEL scripting language
Later,
Stuart
Tuesday, June 30, 2015
Maya Course - Lectures on YouTube
Today I uploaded the first three lecture chunks (for lack of a better word) of the course I taught this spring on YouTube free for anyone to watch.
The course was offered through the Masters of Science in Biomedical Communications program, the Master's program that I completed two years ago. It covers intermediate and advanced Maya topics, or more specifically, pretty much everything that isn't modelling and texturing.
The recorded lectures are largely Maya demonstrations, tutorials, and explanations that focus on the application of a Maya toolset or technique for biomedical content. Admittedly some of the demos are less biomedical and more "let's use some spheres because it's simpler to demonstrate". They assume some prior knowledge of Maya and a decent understanding of the interface and modelling tools.
Lecture topics (that I will be posting regularly) include Animation, Rigging, nParticles, Optimization, nHair, nCloth, Fluids, Motion Tracking and Compositing with AE, and MEL scripting. I very much hope that you will subscribe to my YouTube channel to view the tutorials as soon as they are posted. There will be 35 videos of varying lengths in the series, so lots of content to come.
Thanks for checking them out! I hope they are informative and useful, and if so, please share them around.
Later,
Stuart
The course was offered through the Masters of Science in Biomedical Communications program, the Master's program that I completed two years ago. It covers intermediate and advanced Maya topics, or more specifically, pretty much everything that isn't modelling and texturing.
The recorded lectures are largely Maya demonstrations, tutorials, and explanations that focus on the application of a Maya toolset or technique for biomedical content. Admittedly some of the demos are less biomedical and more "let's use some spheres because it's simpler to demonstrate". They assume some prior knowledge of Maya and a decent understanding of the interface and modelling tools.
Lecture topics (that I will be posting regularly) include Animation, Rigging, nParticles, Optimization, nHair, nCloth, Fluids, Motion Tracking and Compositing with AE, and MEL scripting. I very much hope that you will subscribe to my YouTube channel to view the tutorials as soon as they are posted. There will be 35 videos of varying lengths in the series, so lots of content to come.
Thanks for checking them out! I hope they are informative and useful, and if so, please share them around.
Later,
Stuart
Monday, December 1, 2014
Non-repeating noise in maya
I'm creating a large surface that I want to have very fine noise. I made a fractal texture and got a style of noise I was fairly happy with. However, to get the scale right, I needed to increase the repeatU and repeatV a ton, around 800. This creates obvious and ugly repeats.
A quick google search led me to this blog post: http://www.sigillarium.com/blog/lang/en/318/
The author describes using two animated fractals (animated just to get two different values) as input to the translateU and translateV of the original fractal. I tried a couple variations of this, but the biggest problem I found was that it destroyed the integrity (shapes) of the original fractal I created. Sometimes it made weird swirly noise, other times it just created tiny random noise.
After thinking about it a bit, I decided to pipe the outAlpha of a simple fractal into the time attribute of my crafted fractal with animated checked on. This resulted in a variation of the evolution of the fractal over the surface and really reduced any noticeable repetition, while largely maintaining the "structure" of the original fractal, because it is just evolving different parts of the surface to different times.

Hope that helps someone out and thanks to Sigillarium for the foundation of the idea.
Later,
Stuart
A quick google search led me to this blog post: http://www.sigillarium.com/blog/lang/en/318/
The author describes using two animated fractals (animated just to get two different values) as input to the translateU and translateV of the original fractal. I tried a couple variations of this, but the biggest problem I found was that it destroyed the integrity (shapes) of the original fractal I created. Sometimes it made weird swirly noise, other times it just created tiny random noise.
After thinking about it a bit, I decided to pipe the outAlpha of a simple fractal into the time attribute of my crafted fractal with animated checked on. This resulted in a variation of the evolution of the fractal over the surface and really reduced any noticeable repetition, while largely maintaining the "structure" of the original fractal, because it is just evolving different parts of the surface to different times.
Hope that helps someone out and thanks to Sigillarium for the foundation of the idea.
Later,
Stuart
Tuesday, May 13, 2014
Better transcription with VLC and Notepad++
Yesterday I posted about humorously bad automatic audio transcription. Turns out that's not the answer, so I turned to the manual route for the time being.
The biggest problem is that because I don't have any dedicated transcription software, I am stuck with a very awkward method of alt tabbing between VLC (the media player) and notepad++ (my text editor) along with spacebar (to play and pause) and alt+left and alt+right to skip a few seconds backward and forward. This becomes really clumsy when I don't pause before switching to notepad++ so the audio keeps playing too far, or I forget where I am and start trying to type in the VLC window. Very slow. So I set about remedying this. What follows is my solution and perhaps might help you speed up your transcription too if you can't afford to buy dedicated software. I'm sure there are some other free tools around or more elegant solutions, but I like using Notepad++ and VLC and my solution is working well for me so far. It should work with any text editor, although VLC is necessary for this system.
So if you're following along at home, get VLC and AutoHotkey and Notepad++ [optional] and Windows. Sorry, AutoHotkey is Windows only as far as I know.
I built a little script that would help me out as it's running in the background. Because I have a keyboard (Logitech G710+) with several macro keys, I was able to bind a complex hotkey to a single button that I can reach with my pinky while typing. I chose Ctrl+alt+(a number) because that wasn't bound to anything already in notepad++ and I didn't have to remember it anyway. The huge advantage is that I am able to play, pause, jump back and forward without losing focus in my text editor. I never have to take my hands off the keyboard or touch the VLC window. With the final hotkey, Ctrl+alt+5 bound to G1, I can pull the current timecode from the media file and paste it into my text editor so that I can mark the spot I'm transcribing.
Here are the keys and their functions in the order I can reach them on my keyboard:
G6: Ctrl+alt+8 - Play or pause the VLC media file, without losing focus in the text editor
G5: Ctrl+alt+9 - Jump back 3 seconds
G4: Ctrl+alt+0 - Jump forward 3 seconds
G3: Ctrl+alt+7 - Jump back 10 seconds
G2: Ctrl+alt+6 - Jump forward 10 seconds
G1: Ctrl+alt+5 - Paste the current timecode into the text
You can edit the "jump distances" by tweaking what Alt+left, right, and Ctrl+left, right do in VLC:

You can use the hotkeys even without a macro keyboard; just edit them in the .ahk file to something a little easier, like Ctrl+` or something. Some helpful documentation on that here.
Finally, you can download the script here!
Hope that helps someone, because it's saving me lots of headaches already.
Later,
Stuart
The biggest problem is that because I don't have any dedicated transcription software, I am stuck with a very awkward method of alt tabbing between VLC (the media player) and notepad++ (my text editor) along with spacebar (to play and pause) and alt+left and alt+right to skip a few seconds backward and forward. This becomes really clumsy when I don't pause before switching to notepad++ so the audio keeps playing too far, or I forget where I am and start trying to type in the VLC window. Very slow. So I set about remedying this. What follows is my solution and perhaps might help you speed up your transcription too if you can't afford to buy dedicated software. I'm sure there are some other free tools around or more elegant solutions, but I like using Notepad++ and VLC and my solution is working well for me so far. It should work with any text editor, although VLC is necessary for this system.
So if you're following along at home, get VLC and AutoHotkey and Notepad++ [optional] and Windows. Sorry, AutoHotkey is Windows only as far as I know.
I built a little script that would help me out as it's running in the background. Because I have a keyboard (Logitech G710+) with several macro keys, I was able to bind a complex hotkey to a single button that I can reach with my pinky while typing. I chose Ctrl+alt+(a number) because that wasn't bound to anything already in notepad++ and I didn't have to remember it anyway. The huge advantage is that I am able to play, pause, jump back and forward without losing focus in my text editor. I never have to take my hands off the keyboard or touch the VLC window. With the final hotkey, Ctrl+alt+5 bound to G1, I can pull the current timecode from the media file and paste it into my text editor so that I can mark the spot I'm transcribing.
Here are the keys and their functions in the order I can reach them on my keyboard:
G6: Ctrl+alt+8 - Play or pause the VLC media file, without losing focus in the text editor
G5: Ctrl+alt+9 - Jump back 3 seconds
G4: Ctrl+alt+0 - Jump forward 3 seconds
G3: Ctrl+alt+7 - Jump back 10 seconds
G2: Ctrl+alt+6 - Jump forward 10 seconds
G1: Ctrl+alt+5 - Paste the current timecode into the text
You can edit the "jump distances" by tweaking what Alt+left, right, and Ctrl+left, right do in VLC:
You can use the hotkeys even without a macro keyboard; just edit them in the .ahk file to something a little easier, like Ctrl+` or something. Some helpful documentation on that here.
Finally, you can download the script here!
Hope that helps someone, because it's saving me lots of headaches already.
Later,
Stuart
Thursday, May 8, 2014
Adding variation to objects using a single shader
I'm working on a scene with many (potentially hundreds) of objects which are pretty much the same. In fact there are many instances with the same shape node. I wanted some subtle variation in the color of the objects, not over the surface of an object, but on an object to object basis.

After doing some research, I encountered a method described here which uses a triple switch node. I've used shading switch nodes a little bit in Maya before so this seemed feasible. The biggest problem, however, was that the method doesn't work with instanced objects out of the box. So I set out to develop a "better" system that works even with instanced objects and combinations of instanced and non-instanced objects.
The idea is that you create a ramp that is piped into any attribute you want to vary. The ramp shows a range of colors and each object gets a random value which corresponds to a single location on the ramp. If you're not able to get a ramp looking random enough for the extent of variation you want, you can always play with the HSV Color Noise attributes or plug something else into the ramp.
1) The image below shows how to setup the initial shading network. Plug a V ramp into the attribute of choice in your material and then create a Single Switch which gets plugged into the place2Dtexture node (output > vCoord).
Edit Dec 2015: Probably simpler to skip the place2dTexture and plug the singleShadingSwitch.output directly to the vCoord of the ramp.

2) Then assign your material to everything you want to exhibit the variation.
3) Then open the AE for your shading switch and press the Add Surfaces button.
4) Then run this code. Just paste it into the script editor, select it all and "execute" or hit enter on the numpad.
5) Because this is all about visible connections, you can always tweak the ramp or even tweak the random values for individual objects. To do that, adjust the attribute called Rand VCoord to any value from 0–1. The effects probably won't show up in the viewport, but if you hit render the values should appear.
Here are a couple of examples:
I was particularly concerned about instanced objects working with this and so I tested it on my molecular geometry. The first test only gave two different random values because it was the transform node that was itself instance above the coiled coil level of the hierarchy. So I pulled everything out of the hierarchy (not ideal, but works as a quick last step) which resulted in transform1 transform 2... transform 96 each with an instanced transform as a child. In order to put the random attribute on the proper transform, I just added two lines of code that changed the focus from the child to the parent (those are the two commented lines other than the debug print statements). Then I got the middle image, which is a bit extreme, but it works! So I tweaked my ramp a few times and got the image on the right in no time at all.

You can also use this method to add things other than random variation. Instead of a random value, you could assign the distance to the camera (mapped to 0–1 with setRange) or any other per-object transform info.
Later,
Stuart
After doing some research, I encountered a method described here which uses a triple switch node. I've used shading switch nodes a little bit in Maya before so this seemed feasible. The biggest problem, however, was that the method doesn't work with instanced objects out of the box. So I set out to develop a "better" system that works even with instanced objects and combinations of instanced and non-instanced objects.
The idea is that you create a ramp that is piped into any attribute you want to vary. The ramp shows a range of colors and each object gets a random value which corresponds to a single location on the ramp. If you're not able to get a ramp looking random enough for the extent of variation you want, you can always play with the HSV Color Noise attributes or plug something else into the ramp.
1) The image below shows how to setup the initial shading network. Plug a V ramp into the attribute of choice in your material and then create a Single Switch which gets plugged into the place2Dtexture node (output > vCoord).
Edit Dec 2015: Probably simpler to skip the place2dTexture and plug the singleShadingSwitch.output directly to the vCoord of the ramp.
2) Then assign your material to everything you want to exhibit the variation.
3) Then open the AE for your shading switch and press the Add Surfaces button.
4) Then run this code. Just paste it into the script editor, select it all and "execute" or hit enter on the numpad.
string $switch = "singleShadingSwitch1"; //change this name to the switch you want
string $connectedAttr[] = `listConnections -c true -d false -t "shape" $switch`;
//print $connectedAttr; //DEBUG
for ($i = 0; $i < (size($connectedAttr)/2); $i++){
string $obj = $connectedAttr[($i*2)+1];
//string $parent[] = `listRelatives -p $obj`; //get parent transform for instanced transforms
// $obj = $parent[0]; //change object relationship to parent
//print $obj + "\n"; //DEBUG
if (!`attributeExists "randVCoord" $obj`){ //checks if attribute exists
addAttr -at "float" -ln "randVCoord" -keyable true -hidden false -min 0 -max 1 $obj;
}
float $randCoord = rand(0,1);
setAttr ($obj + ".randVCoord") $randCoord; //set random number to custom transform attribute
if (!`isConnected ($obj + ".randVCoord") ($switch + ".input[" + $i + "].inSingle")`){
connectAttr ($obj + ".randVCoord") ($switch + ".input[" + $i + "].inSingle");
}
}
You may have to edit the name of the singleShadingSwitch in the script. I was thinking making a custom input dialog but getting the functionality was difficult enough and I didn't want to delve into the whole GUI aspect.string $connectedAttr[] = `listConnections -c true -d false -t "shape" $switch`;
//print $connectedAttr; //DEBUG
for ($i = 0; $i < (size($connectedAttr)/2); $i++){
string $obj = $connectedAttr[($i*2)+1];
//string $parent[] = `listRelatives -p $obj`; //get parent transform for instanced transforms
// $obj = $parent[0]; //change object relationship to parent
//print $obj + "\n"; //DEBUG
if (!`attributeExists "randVCoord" $obj`){ //checks if attribute exists
addAttr -at "float" -ln "randVCoord" -keyable true -hidden false -min 0 -max 1 $obj;
}
float $randCoord = rand(0,1);
setAttr ($obj + ".randVCoord") $randCoord; //set random number to custom transform attribute
if (!`isConnected ($obj + ".randVCoord") ($switch + ".input[" + $i + "].inSingle")`){
connectAttr ($obj + ".randVCoord") ($switch + ".input[" + $i + "].inSingle");
}
}
5) Because this is all about visible connections, you can always tweak the ramp or even tweak the random values for individual objects. To do that, adjust the attribute called Rand VCoord to any value from 0–1. The effects probably won't show up in the viewport, but if you hit render the values should appear.
Here are a couple of examples:
 |
| Red to Blue ramp into the color |
 |
| Fractal noise into the bump channel with shader switch controlling amplitude |
You can also use this method to add things other than random variation. Instead of a random value, you could assign the distance to the camera (mapped to 0–1 with setRange) or any other per-object transform info.
Later,
Stuart
Tuesday, April 29, 2014
Creating an embossed watermark
I recently heard a talk about watermarking your images and different ways to add your copyright information without it being easily removed. I'm not the best at that currently, though I typically try to add something that doesn't detract too much from the image. I also don't sell any work currently, so I'm not too terribly fussed about holding everything close yet, although I understand its importance.
But it got me thinking that it would be nice to have a way to embed a little signature in the 3D environment itself. Just like a potter or sculptor can use a little stamp to mark their signature in clay, it would be cool to easily add my own signature to 3D sculpts or rendered scenes.
First I created in illustrator a graphic signature. I was inspired by greek patterns and asian characters. I might play with this idea more, but for now here it is.

I exported from illustrator as a png. I used 512x512 but that might be overkill. Bringing it into Illustrator, I added some space around the edges since the export cropped right to the art. Just a small amount of space is really necessary (not as much as above), because then I blurred the edges a bit, perhaps 1-2 pixel Gaussian blur, which will result in a slight bevel. Then you can use the image to make a stamp in various applications.
ZBrush:
I don't actually have ZBrush installed here, so I can't guarantee these steps will work perfectly.
Invert the image so that the surrounding area is black. I believe by default black has no effect on the surface and white is maximum effect. You can experiment with different sizes and 8-bit and 16-bit images to see what gives the best result. It seems like ZBrush alphas are generally psd files.
Then bring the image into ZBrush as an alpha and apply it with a DragRect brush. Hold ctrl to cut the alpha into the surface instead of bringing it out.
Mudbox:
Similar to ZBrush, export the inverted image and add it to your list of stencils. Choose the imprint sculpt tool and select your stencil. Adjust the position and size of the stencil and then make sure your brush size is larger than the whole stencil. Set the strength to an appropriate amount (m) and paint once over the stencil. You now have a lovely embossed signature.

Maya:
Adding the signature as a displacement map is a little trickier. There are probably many good ways to do this, but the following is how I ended up getting the result I wanted.
First in Photoshop set your background to exactly mid grey and leave the signature area as black. Export as an image, and in Maya create a displacement node and plug your image file into it (file.outAlpha > displacementNode.displacement). Leave the scale as 1 in the displacement node. Plug the displacement node into the shading group of whatever shader is on your object (displacementNode.displacement > myShader1SG.displacementShader).
Check Alpha Is Luminance in the file node. In order to make sure that the middle grey keeps the rest of the surface at the same depth you must correct the alpha values. Create an expression that sets the Alpha Offset to -0.5 times the Alpha Gain (file1.alphaOffset = file1.alphaGain*-0.5;). You can now play with the Alpha Gain to get the right depth (try a value around 0.05). Also make sure the Default Color is black, the Color Gain is white, and the Color Offset is black (It seems weird that the default color would be black while the surrounding color in the texture itself is mid-grey, but it seems to only work if that's the case).
You may have to tweak the place2dTexture Coverage and Translate Frame to place the image in the right position, depending on the UVs. I experimented with adding multiple UV sets to lay out some new UVs to get the texture in the right spot, but unfortunately it seems like displacement maps can't work with alternate UV sets. I suppose you could create a new UV set for your regular textures and use map1 as your "signature" set.
You can also add a separate color for the embossing: just add a new texture or shader and set up a layered texture or shader. Use the outColor from a new black and white copy of the image as the transparency for your regular texture, and might as well use the same place2Dtexture for that B&W image too. You can also add Ambient Occlusion to the mix by creating a surface shader, plugging a mib_amb_occlusion node into the color, and putting the displacement node into the shading group for the AO SS. You will need at least two AO surface shaders, one for everything that doesn't have a displacement map, and one for each object that does. I've included an image of the shading network, to hopefully illustrate what's going on.

Finally, it's a good idea to create a mentalrayDisplacementApproximation with the mental ray Approximation Editor to increase the quality of the displacement. Increase the U and V subdivisions to smooth out the result.

Happy Embossing!
Later,
Stuart
PS I just looked it up and apparently if it's sunk into the surface, it's debossing. Apologies.
But it got me thinking that it would be nice to have a way to embed a little signature in the 3D environment itself. Just like a potter or sculptor can use a little stamp to mark their signature in clay, it would be cool to easily add my own signature to 3D sculpts or rendered scenes.
First I created in illustrator a graphic signature. I was inspired by greek patterns and asian characters. I might play with this idea more, but for now here it is.
I exported from illustrator as a png. I used 512x512 but that might be overkill. Bringing it into Illustrator, I added some space around the edges since the export cropped right to the art. Just a small amount of space is really necessary (not as much as above), because then I blurred the edges a bit, perhaps 1-2 pixel Gaussian blur, which will result in a slight bevel. Then you can use the image to make a stamp in various applications.
ZBrush:
I don't actually have ZBrush installed here, so I can't guarantee these steps will work perfectly.
Invert the image so that the surrounding area is black. I believe by default black has no effect on the surface and white is maximum effect. You can experiment with different sizes and 8-bit and 16-bit images to see what gives the best result. It seems like ZBrush alphas are generally psd files.
Then bring the image into ZBrush as an alpha and apply it with a DragRect brush. Hold ctrl to cut the alpha into the surface instead of bringing it out.
Mudbox:
Similar to ZBrush, export the inverted image and add it to your list of stencils. Choose the imprint sculpt tool and select your stencil. Adjust the position and size of the stencil and then make sure your brush size is larger than the whole stencil. Set the strength to an appropriate amount (m) and paint once over the stencil. You now have a lovely embossed signature.
Maya:
Adding the signature as a displacement map is a little trickier. There are probably many good ways to do this, but the following is how I ended up getting the result I wanted.
First in Photoshop set your background to exactly mid grey and leave the signature area as black. Export as an image, and in Maya create a displacement node and plug your image file into it (file.outAlpha > displacementNode.displacement). Leave the scale as 1 in the displacement node. Plug the displacement node into the shading group of whatever shader is on your object (displacementNode.displacement > myShader1SG.displacementShader).
Check Alpha Is Luminance in the file node. In order to make sure that the middle grey keeps the rest of the surface at the same depth you must correct the alpha values. Create an expression that sets the Alpha Offset to -0.5 times the Alpha Gain (file1.alphaOffset = file1.alphaGain*-0.5;). You can now play with the Alpha Gain to get the right depth (try a value around 0.05). Also make sure the Default Color is black, the Color Gain is white, and the Color Offset is black (It seems weird that the default color would be black while the surrounding color in the texture itself is mid-grey, but it seems to only work if that's the case).
You may have to tweak the place2dTexture Coverage and Translate Frame to place the image in the right position, depending on the UVs. I experimented with adding multiple UV sets to lay out some new UVs to get the texture in the right spot, but unfortunately it seems like displacement maps can't work with alternate UV sets. I suppose you could create a new UV set for your regular textures and use map1 as your "signature" set.
You can also add a separate color for the embossing: just add a new texture or shader and set up a layered texture or shader. Use the outColor from a new black and white copy of the image as the transparency for your regular texture, and might as well use the same place2Dtexture for that B&W image too. You can also add Ambient Occlusion to the mix by creating a surface shader, plugging a mib_amb_occlusion node into the color, and putting the displacement node into the shading group for the AO SS. You will need at least two AO surface shaders, one for everything that doesn't have a displacement map, and one for each object that does. I've included an image of the shading network, to hopefully illustrate what's going on.
Finally, it's a good idea to create a mentalrayDisplacementApproximation with the mental ray Approximation Editor to increase the quality of the displacement. Increase the U and V subdivisions to smooth out the result.
Happy Embossing!
Later,
Stuart
PS I just looked it up and apparently if it's sunk into the surface, it's debossing. Apologies.
Friday, May 31, 2013
Luminance depth layer with mental ray
This is the first post in quite a long time that's not related to my master's research project (well it is, kinda), but I felt like I had to share this, because it resolves a pretty long standing issue that has bothered me. Hopefully it is of use to a couple other people as well.
First off, credit for this goes to this member of creative cow (all of six years ago): http://forums.creativecow.net/thread/61/857907#857910
Rendering a luminance depth (or z-depth) layer in mental ray so that it respects smooth mesh preview:
There are a number of ways to get a depth pass out of maya that I won't get into. I much prefer to use a separate render layer because it is so fast to (re-)render and you have much more control over the details, than if you use a render pass on a beauty layer. But the problem with using the luminance depth preset on a render layer is that it forces you to use Maya software, which doesn't respect smooth mesh preview, so your depth pass doesn't line up with your other passes (I'm referring to layers and passes interchangeably here). And if you switch to mental ray, the pre-built shader setup doesn't work when you batch render.
So, here is the shading network that will give you the exact same information as the luminance depth preset, but in mental ray.
1) Create each of these nodes and link them as follows:

a) samplerInfo.pointCamera > distanceBetween.point1
b) distanceBetween.distance > setRange.valueX
c) setRange.outValueX > Ramp.vCoord
d) Ramp.outColor > SurfaceShader.outColor
2) It doesn't look like it in the thumbnail, but the ramp should look like this (white on bottom, black on top)
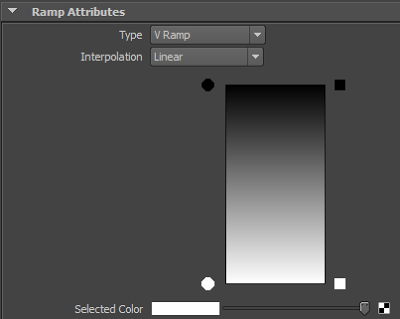
3) And the final things are to change the Max value in the setRange to 1 (I think this might have been missed in the original thread). And change the Old min and Old max to the range you want the transition to be over. Use the distance tool to check the distance you want. You can key this as well, but it might be easier to do that in post, depending on the scene.
Update (28/08/2014): I have noticed that in some instances large world distance values don't work. Instead I have to divide the values by 10 or 100 to get a proper range. I suspect this has something to with camera coordinate space, which is what the samplerInfo is using, but I don't really understand it. Comments are welcome on this point.

4) And the actually real final thing is to put all your geo into a new render layer and give it a material override with this new surface shader.
5) And render.
And this is the difference between maya software and mental ray.


PS Okay, one last tip I'm experimenting with. nHair doesn't seem to work with this custom surface shader (there might be a way). The hair I want to be in the depth pass is darkish grey, so I've just added a directional light and increased the intensity until the hair renders at about the value I want. Nothing else is affected of course. Not super precise, but better than not including the hair in the depth pass. We'll see how it turns out.
First off, credit for this goes to this member of creative cow (all of six years ago): http://forums.creativecow.net/thread/61/857907#857910
Rendering a luminance depth (or z-depth) layer in mental ray so that it respects smooth mesh preview:
There are a number of ways to get a depth pass out of maya that I won't get into. I much prefer to use a separate render layer because it is so fast to (re-)render and you have much more control over the details, than if you use a render pass on a beauty layer. But the problem with using the luminance depth preset on a render layer is that it forces you to use Maya software, which doesn't respect smooth mesh preview, so your depth pass doesn't line up with your other passes (I'm referring to layers and passes interchangeably here). And if you switch to mental ray, the pre-built shader setup doesn't work when you batch render.
So, here is the shading network that will give you the exact same information as the luminance depth preset, but in mental ray.
1) Create each of these nodes and link them as follows:

a) samplerInfo.pointCamera > distanceBetween.point1
b) distanceBetween.distance > setRange.valueX
c) setRange.outValueX > Ramp.vCoord
d) Ramp.outColor > SurfaceShader.outColor
2) It doesn't look like it in the thumbnail, but the ramp should look like this (white on bottom, black on top)

3) And the final things are to change the Max value in the setRange to 1 (I think this might have been missed in the original thread). And change the Old min and Old max to the range you want the transition to be over. Use the distance tool to check the distance you want. You can key this as well, but it might be easier to do that in post, depending on the scene.
Update (28/08/2014): I have noticed that in some instances large world distance values don't work. Instead I have to divide the values by 10 or 100 to get a proper range. I suspect this has something to with camera coordinate space, which is what the samplerInfo is using, but I don't really understand it. Comments are welcome on this point.

4) And the actually real final thing is to put all your geo into a new render layer and give it a material override with this new surface shader.
5) And render.
And this is the difference between maya software and mental ray.


There is still faceting in the mental ray, but in that case you have the control, instead of being limited to maya software render. Let me know in the comments if it works for you, or if I've missed something.
And my render is done, so I'll jump back to maya now.
Later,
Stuart
PS Okay, one last tip I'm experimenting with. nHair doesn't seem to work with this custom surface shader (there might be a way). The hair I want to be in the depth pass is darkish grey, so I've just added a directional light and increased the intensity until the hair renders at about the value I want. Nothing else is affected of course. Not super precise, but better than not including the hair in the depth pass. We'll see how it turns out.
Monday, October 15, 2012
Metastatic Bone Disease
For the pathology course, initially I was set to do an illustration on leprosy, but for various reasons, it proved to be not the best topic. So I've decided to illustrate Metastatic Bone Cancer, which should be more interesting, comprehensible, relevant, understood, and satisfying as a final product. I've done a couple of tissue studies. As I've been doing research, I understand that there are several aspects of these studies that I will need to correct or improve for the final illustration. But they serve the purpose of trying to understand the tissue and the accompanying visual problems.
This is a perspective view of tissue cubes, showing a metastasis growing over time and eroding the trabeculae.

This is a color study with pencil crayon, showing a rib with associated intercostal muscle and a pathologic fracture.

I also created a series of tutorials in Cinema4D and After Effects for classmates for a group project we're working on. I honestly don't expect anyone to watch all 1hr+ of it, but the first couple minutes of the first one might give an idea of the scope of the tutorial.
Later,
Stuart
This is a perspective view of tissue cubes, showing a metastasis growing over time and eroding the trabeculae.

This is a color study with pencil crayon, showing a rib with associated intercostal muscle and a pathologic fracture.

I also created a series of tutorials in Cinema4D and After Effects for classmates for a group project we're working on. I honestly don't expect anyone to watch all 1hr+ of it, but the first couple minutes of the first one might give an idea of the scope of the tutorial.
Later,
Stuart
Subscribe to:
Posts (Atom)