Showing posts with label Modelling. Show all posts

Friday, February 15, 2019

Knots and Robots

I've made various promises to share some recent work, and it's high time I follow-up on that. Over the past few years, I've done a number of freelance animation and illustration jobs, mainly for Professor David Leigh, who runs a Chemistry laboratory at the University of Manchester.

On several occasions I've been privileged to be able to work alongside this research group, who perform intriguing research in the field of molecular robots and molecular knots (What are those? See below for some more explanation). My contributions have been primarily visual analogies of the science behind their work.

I designed editorial illustrations to generate interest in the research and for use as cover images of the journals in which the research is published. I shared one example in my previous post and here's another example on the subject of molecular knots:

An eight-crossing molecular knot and some ions
What's a molecular knot? And why tie one? It's essentially a looped molecule that isn't just a loop. So… it loops through itself at least a few times. There's an interesting (to me) mathematical field of knots, where different kinds of knots are classified based on numbers of crossings–and I probably shouldn't get too far down this rabbit hole. So why create a molecular knot? In my mind, it's about finding novel ways of chemically synthesizing new structures, which could be useful in materials science, manufacturing, and nanotechnology.

It seemed logical to depict this particular molecule as a knotted rope, and I went with a nautical theme, including a central chloride ion represented as a Japanese glass fishing float. To get the right feeling of a heavy, thick rope, I spent a long time working with displacement maps to get the right texture, and I scattered loose hairs with a MASH network.


The illustration didn't end up on the cover of Science, sadly (these choices are made by the publisher for various reasons), but it did show up on various sites, from Forbes to NPR and was an "Image of the Day" for The Scientist and apparently appears in the 2019 Guinness Book of World Records, for the entry "Tightest knotted structure".

Following the creation of an illustration, I was often tasked with developing short animations to be used in presentations of the research. This knot synthesis animation was a huge technical challenge, but a rewarding project.


If I remember correctly, I ended up using three or four different rope rigging setups to create the necessary behaviours as the lengths of rope assembled themselves.

A technical mess looking like the proverbial Gordian Knot
One of the hardest parts, as you might imagine, was the binding action and getting the rope "tendrils" to wrap around each other; I had to carefully measure how far each rope-end was from its neighbours to get the action correct.


In addition to the "knot" work, I also ended up doing a few "molecular robot" pieces. One robot that the lab developed was capable of moving a cargo molecule from one binding site to another, controlled purely by the addition of different chemicals, such as certain acids and bases.


But what does this robot actually look like? Well, we can't observe molecules of this size directly, but here's the chemical structure, showing all the atoms that comprise it.

You can see why I used a lot of hexagon motifs
The lab developed this concept further and designed a programmable molecular robot with a similar structure to the one above. This new molecule can synthesize different stereoisomers, driven once again by different chemical reagents. What are stereoisomers? They are sets of related molecules that differ only in the 3D orientation of atoms. So think of one molecule having an atom sticking out the front, and its "stereoisomer" partner has the corresponding atom sticking out the back.


I had an early concept for a delivery system for the atoms (shown as colored balls in the video), which I think is kind of fun, but we ended up with a simpler concept where the atoms just fly to the tables.


I also had fun designing the peripheral apparatuses (apparati?) to fit with the mechanical theme:

Substrate entry...
... and chemical product exit

I will conclude this lengthy post here (granted much has happened in the last couple years). Thanks for reading all the way down here. Next week I'll share some details about my new workstation, which may be of interest to some?

Finally, an optional "Call to Action": If you'd like to help me out tremendously, subscribing to my Biocinematics channel and liking the most recent two videos (if indeed that aligns with your feelings towards them) would be massively appreciated. If you have already have a Google account or Gmail account, you don't need to sign up for anything new or take any extra steps. If you'd like to go the extra mile, you could share this YouTube channel with friends or family who might be interested in educational science-y stuff.

Thanks again for reading and supporting me,

Stuart

Monday, April 7, 2014

More bricks and plates

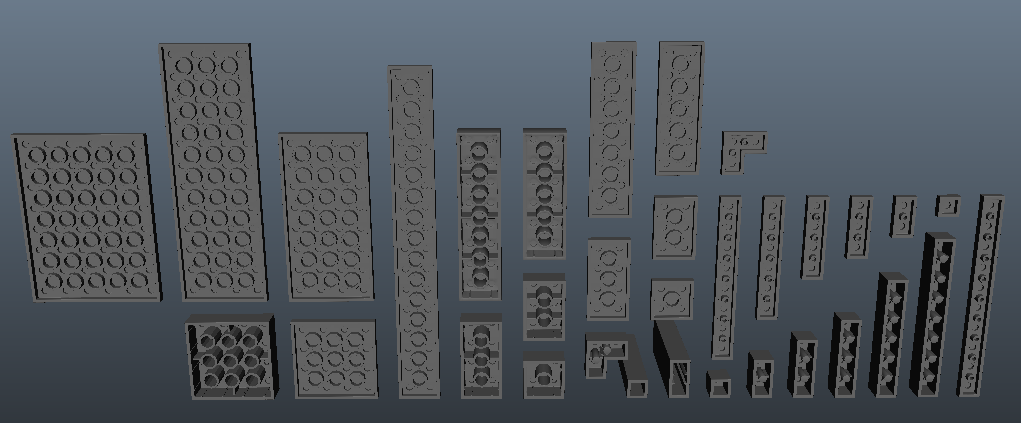
A bit more work on some more basic lego pieces:


Not too much interesting stuff, but still having fun.

Later,
Stuart

Sunday, March 16, 2014

Top and bottoms

More standard bricks. It's interesting that the tops are pretty standard but the bottoms actually vary a fair bit.


I got the lego logo working, but I want to get the bump rendering in the AO pass and that's not quite working yet, so next time I'll have that.
The font looks really narrow here, but if you examine the studs, the logo isn't the same balloony letters you see regularly.

Thursday, March 6, 2014

Your standard Lego brick

Spent far too long on a single brick. Standard bread and butter 4x2 brick. But I figure if I get this one just right, I can create many more combinations very very quickly. We'll see how that turns out. I'm still wrestling with the beveling that Maya has decided to do. Well, I did the beveling, but Maya did a crappy job of placing the vertices and edges. And faces. Feeling very particular about this.


I'm doing a lot more detail than I did with my original Lego project, and it's already getting fun. Need to put the lego logo as a bump or disp map on the studs.

Later,
Stuart

Wednesday, May 8, 2013

RIN - Microscope model

For one of the shots I've doing this week, a thin slice of a mouse's brain will be examined under a microscope. This is one of if not the most complex model I'll be creating for my animation. I fortunately was able to find some great vector references for a Zeiss model (vector is the best when it comes to technical reference images). I modelled this over the past 2 days or so. I'm still experimenting with the best ways to present models. Something like this takes a bit of time to setup, render, and composite, but it looks a lot nicer than screenshots.


Clicken to embiggen.

Later,
Stuart

Tuesday, March 26, 2013

RtIN - Shot #4 and a headless mouse

Here's a still frame from the shot that takes place directly after the walking dynein. The fluorescence is transported along the axons towards the brain.


 And I've started modelling a mouse which will be in quite a few shots, so I'm hoping it's going to be a decent looking mouse.


I've also been working hard on my music visualization project. I've managed to output cubes to represent Pachelbel's Canon. You can see the repeating structure in the bottom third which represents the repetitive cello line. Baaa bummm deee dummm. That one.

Busy times.

Later,
Stuart

Friday, January 25, 2013

RtIN - Petri Dish

A petri dish! I've modelled a bunch of other stuff but I haven't rendered out any WIP images yet. I could post screenshots, but I kind of like the higher production look, even if it means I post less often. Sorry :(


Later,
Stuart

Thursday, January 17, 2013

RtIN - Monitor

Production for "Recording the Illuminated Neuron" has officially begun (well a couple weeks ago) and I've gotten something of a start on modelling. I've spent a bit of time working on getting a WIP rendering system set up so it's easy for me to render out and post WIP images. Still lots of opportunity to tweak the system but I'm happy with the results so far using sIBL from hdrlabs.com.

I haven't decided whether I will want to post renders without wires or with, most of the time. Here are two with wires on top and one without.


Later,
Stuart

Monday, July 30, 2012

Tank modelling

Finally got back to my panzer IV modelling. I'm taking my time about figuring out the main shapes, because if those are wrong, nothing else will be right. It's still hard to figure out which components I should make separate, and which I should build as a single mesh, because in the manufacturing process, the tank started as many many separate pieces, but of course they were welded together, which is difficult to do cleanly digitally. So I'm trying to plan ahead, but that's also difficult to do without much hard surface modelling experience.

And I started on the drive sprocket (the powered wheel), because it was a little more fun.


Later,
Stuart

Tuesday, March 27, 2012

Lab assembly

Getting most of the elements together for the journal cover. WIP render of the stage so far. There's a hamster conspicuously missing here, but it's on the way. Getting the fur/hair system working will be a fun challenge. Nick suggested I use hair instead of fur for more control and faster rendering, and after seeing the difference, I very much agree.


Later,
Stuart

Tuesday, March 6, 2012

Populating the stage

I've been modelling bits and pieces for my journal cover over the past couple of weeks. If you've been keeping tabs on my facebook page, you may have seen some of the assets I've been working on. Here's a quick render of most of the stuff so far that I threw on a multi-tiered stage, just to get an idea of what I still have left to do (lots). Found out that Cinema4D has a cool watermark feature built into the renderer itself.


And of course the big news is that this blog ticked over 10,000 views, so that was pretty exciting in a... somewhat arbitrary statistical way. But thanks so much again for your views, (family, friends, colleagues, and internet passers-by), it really keeps me motivated to learn, create, and share my work and ideas.

Later,
Stuart

Wednesday, February 29, 2012

Lab equipment

Got started on modelling some lab equipment for my journal cover. Still slow going modelling in C4D, but I'm learning some things here and there. I wonder if it'll be tough getting back to a maya workflow after this. Hopefully not.

I really don't know too much about rendering in C4D, so it'll take a while to get good WIP renders out, but here's a type of ambient occlusion for now.

Later,
Stuart

Saturday, January 28, 2012

Car modelling 2

The rolls is coming together... and so is modelling in C4D. I have to say that the tutorial isn't completely working for me though, cause we'll start making a piece and the blueprints are fuzzy and I don't know cars, so it's hard to envision how the piece will look in the end (like the fenders or something). But it's kinda fun at times and it's certainly satisfying to see a model coming together, especially when a strangely contorted piece of geo finds a place and looks automobile-ish.


In other news, my profile has appeared on the BMC website, along with my classmates's. Give 'em a read if you're at all interested. It's certainly a privilege to study with such talented individuals. Click the image below to get to the aforementioned page. The image is serving a dual-purpose as an image and a hyperlink. How convenient.
I've also restarted my personal challenge of reading a book-a-month. January was the Hunger Games trilogy. Okay, so technically that's three books, but they're quite fast to get through, and pretty entertaining. Nothing too mind-blowing, but overall enjoyable. I'll give the trilogy 4/5 stars. I'll probably check out the movie that's coming out too. February book? Not sure yet. I'm currently reading "Lighting and Rendering" and "Confident Color", but I don't think those count as leisure reading.

I'm still working on designing my website, and once I've got something concrete up, well you'll know, because you're all checking stuartjantzen.com on a regular basis, right? No, I was going to say, once that's put together, I'll change this blog style to match the website and be a little easier on the eyes. Hope you're having a good weekend.

Later,
Stuart

PS Oh yeah! The other big news is that I got a new wacom tablet... intuos 4. Can't wait to start doing more photoshop and zbrush work with it.

Wednesday, January 25, 2012

Car modelling

After doing some basic tutorials on C4D and then experimenting with the fruit bowl, I thought the best follow-up would be to do a more in depth modelling tutorial. So I'm following a DT automotive modelling in C4D tutorial; Rolls Royce, I think. This is where I'm at so far.


Before I started, I found the modelling in C4D to be strange, awkward, and unintuitive. That viewpoint hasn't changed dramatically yet, but it's getting there. It really just takes time, seeing other people's workflows and customizing hotkeys and the interface to make tasks as smooth as possible.

I acquired Digital Lighting and Rendering by Jeremy Birn, and I've started reading it. Quite informative and an interesting take on teaching computer graphics. It's not tutorial or even software oriented. Mostly all about concepts, approaches, and ways of thinking, which is really what I wanted.

On monday I viewed an open heart surgery... wow, was that ever interesting. Seeing a beating heart, seeing the difference in color between oxygenated and deoxygenated blood (neither is blue; both are red) and really just getting an appreciation for the demands of time, concentration, knowledge, and physical condition on surgeons.  Couldn't do it. I really couldn't be in that world. But I'm continuing to enjoy being in my world. Couldn't imagine a better academic program, really.

Later,
Stuart

Wednesday, October 12, 2011

Surfing with the Alien Review


Surfing with the Alien (Vol. I) is an organic modelling tutorial from SimplyMaya.com by Jason Edwards.

Banner from SimplyMaya.com
Right up front, the final verdict (cause the full review is admittedly lengthy):
This modelling tutorial is well structured and presented and, while not for beginners to Maya, is great for people who are reasonably new to organic modelling. The vertex tweaking and topology adjustments could have used more verbal explanation, but the UV mapping sections were very helpful and surprisingly painless.


A couple notes about software and structure:
I completed this tutorial using Maya 2012 student version. The tutorial was created using Maya 2011, however I suspect much earlier versions of Maya could handle this tutorial no problem. There were few if any modelling tools or commands used that are new additions to Maya, although the UI is a bit different and may cause some confusion if you are following the tutorial using Maya 2009 or earlier. There are now two other volumes in the Surfing with the Alien series dealing with texturing, detailing in zbrush, and rigging. This review just deals with the first volume, i.e. modelling and UV mapping.

The tutorial is about 10 hrs long and is split into 16 logically defined chapters, each 30-45 minutes long. It includes image planes for the alien (but not the surfboard) along with a scene file showing the final model posed on the surfboard. The video files are quite sizable and the whole thing weighs in at over 2GB. Just something to keep in mind if you are bandwith limited.

And my thoughts on the tutorial:


The tutorial starts off with setting up image planes, which is good because knowing how to do this properly shouldn't always be assumed. From there, things get moving fast. I like to work on the project at the same time as the tutorial is playing on my second monitor. My ideal situation would be to have to pause the video rarely and rewind never. While I could almost keep up in general, pausing on occasion, I have to start off by saying that this tutorial is not meant for people new to Maya, 3D, or modelling. Although the suggested level stated on SimplyMaya.com is beginner, I think this is overly optimistic. Many tools and commands are used without being introduced (wireframe and shaded modes, extruding, inserting edge loops, split poly, working in the outliner and channel box). Explaining these basics would be tedious for people familiar with modelling, but would be necessary for a beginner. So if you don't yet know the difference between insert edge loop and split poly, this isn't the tutorial for you. (Note: In 2012 they've done some messing around with the split poly tool. I thought they'd changed it to “interactive split tool”, but it turns out they've kept the original functionality and added more in the new interactive split tool – either tool will work fine for custom splitting).


Having said that, for an intermediate user or someone who is comfortable at hard-surface modelling and wants to give organics a try, this is a great tutorial for that. The shapes are very roughly blocked out to start, and Jay gives good advice and uses a variety of tools to work efficiently and smoothly. Again, this progresses at a rapid pace, and I think it would be nice to have the instructor stop every now and again, take stock of what we have so far, what features the existing edge loops will define, and how to expect them to evolve as the form takes shape.


The fingers seemed to take shape quickly and simply. The edge flow of the arm and hand is clear and informative. After showing how to shape the thumb, Jay leaves the viewer to finish shaping the other fingers. This makes sense, however, it does mean that you shouldn't expect a final product in the 10 hours it takes to view the tutorial. Even if you are able to model and keep up while the tutorial is playing (which is it's own challenge as I mentioned), some "homework" is required.


I should add a note here about selecting modelling tools. Jay has a custom shelf that he uses. If you aren't familiar with where the commonly used tools are, a) maybe start with a more introductory tutorial, b) check the mesh and edit mesh menus, c) check the maya docs, d) use the find menu help tool, or e) ask the friendly folks over at SimplyMaya.com. I personally like to use marking menus to select common tools and commands. Again, in different versions of Maya, Autodesk likes to change the names of tools and menus, so either look in the docs, or head over to simplymaya and ask politely.


Jay gives plenty of good general advice on production quality models, common pitfalls, things people tend to forget, and has a good sense of humor. He doesn't gloss over errors, instead works through the troubleshooting and provides the solution, albeit sometimes without much explanation.


The lack of explanation is probably my main criticism of the tutorial. Since I work through at the same time as the video is playing, I really appreciate a running commentary on what is happening. This is present in large part, but often the audio is limited to “we'll grab this and move it around here.” Instead of "just move this there and give that a tweak" I would prefer the instructor to give things names (preferably using anotomical terms) or be a bit more specific about the verbal instructions (e.g. we'll pull the bridge of the nose a bit further out, or we'll push back the corners of the mouth). The head especially would benefit from that, because it was hard to anticipate which edge loops would be pulled out from the face and which would be pushed in to provide the desired contours. Even looking at the video, it's often difficult to see exactly what is being selected, so something like “grab the third innermost edge loop of the mouth” would go a long way in my opinion. To be fair, the commentary is very decent in places, but ideally, clear and anatomically based verbal guidelines throughout each chapter would be excellent.


The shaping sections get a bit tedious, being mostly vertex pushing, as the author acknowledges. Of course you can fast forward some bits and try to do the shaping on your own, however, I wouldn't recommend that for myself at least, because I would struggle trying to deduce the occasional topology adjustment and re-routing of edge loops that does happen. In fact, it can be tricky to work out exactly how Jay is modifying the topology, since my piece looked slightly different based on how I tweaked the vertices, and sometimes it's necessary to stop and puzzle out independently how to get the same topology.


Jay sometimes uses a custom script called spin-faces. You can find this on creativecrash.com, or do it manually which shouldn't be hard. However, in Maya 2012 there is now “spin edge forward” and “spin edge backward” under the edit mesh menu which does the same thing (just select the edge to rotate instead of the faces as Jay does).


After the alien was complete, it was fun to create some accessories, including clothes, jewellery, and a surfboard. Some different modelling techniques are introduced, including creative use of some non-linear deformers. Unfortunately the surfboard image planes don't seem to be included in the supplied files, but since the object is pretty simple, I didn't struggle with not having the reference (yes, it was part of the tutorial to put fins on top of the sufboard too; it is an alien after all).


The UV mapping for me was a highlight of the tutorial. UVing gets a bad rap, but under Jay's direction, it's not as tedious as you'd expect. Jay goes over helpful troubleshooting tips and solutions and workflow improvements. Like modelling the fingers, Jay leaves it to the viewer to UV the legs and feet since it's the same process as arms and legs.


There seems to be a bug near the end of part 15 where the audio continues but the video quits. I've contacted an admin at Simply Maya, and if it's not a problem on my computer's end, I'm sure it will get sorted out in no time. I've always had great success with the people over at Simply Maya.


Though there were times while following the tutorial that were frustrating or tedious and ultimately I wasn't that happy with how my alien's face turned out (it's my fault that it's kinda noobish looking), often I was reminded how fun it is to model in Maya, and I'm rather pleased with the final product as a whole. I'd recommend this tutorial to any intermediate modeller as excellent project-based training for organic modelling.


Thanks to Jay and Simply Maya!

P.P.S. (Personal Plug Script) If you're visiting from Simply Maya, welcome to my blog! I hope you stick around and check out some of my personal and biomedical projects.

Wednesday, April 20, 2011

HEV suit... jetpack not included


Title = lame attempt at bridging worms and hl.... anyway.
Here's an update on the suit and I put some color in so you can actually see where the parts are at the moment.


Don't forget to vote on the poll... :)

Later,
Stuart

Friday, April 8, 2011

Zero point energy field manipulator

Started working on the gravity gun because I figured it would be more fun than trying to work out the HEV suit. I was right. Still lots of work to go, cause I want to stylize it more and get the pieces fitting together better, but it's a start:


And then the view that you usually see...


And a quick pose with the good doctor himself:


And finally a little advertisement... if you like my blog, feel free to post stuff on fakebook, I mean facebook, cause I'm not registered, or twitter, or whatever new social networking is coming down the interweb tubes. I'm still stuck in the blog era, remember. And there's always the subscribe feed in the sidebar over there. There, enough promotion for a few months.

Have yourself a good weekend!
Later,
Stuart