Showing posts with label Texturing. Show all posts

Monday, May 18, 2015

SaD - About the Cover

I released my first novel two days ago (http://www.amazon.com/dp/B00XS2Y6QQ) and interestingly, the cover was one of the most challenging parts (see the previous post for a nice look at the cover). I played around with a couple of 2D geometric/graphical ideas and then discarded those in favor of a 3D recreation of one of the characters from the book.

The book is full of plants and animals similar yet dissimilar to those we are currently surrounded by. I wanted to capture a bit of mystery, a bit of familiarity, and a bit of softness and appealing texture. An image came to mind of an animal with a long curved tail, a back, and ears visible almost in silhouette. Perhaps someone else has done this and I subconsciously borrowed the idea, but I think it suits the feel of the novel. If you read the book, you'll know who the character is ( buy it ).

ZBrush is a great tool for messing around with ideas in digital clay, and dynamesh allows you to work without worrying about edge flow, poly counts, or anything technical.
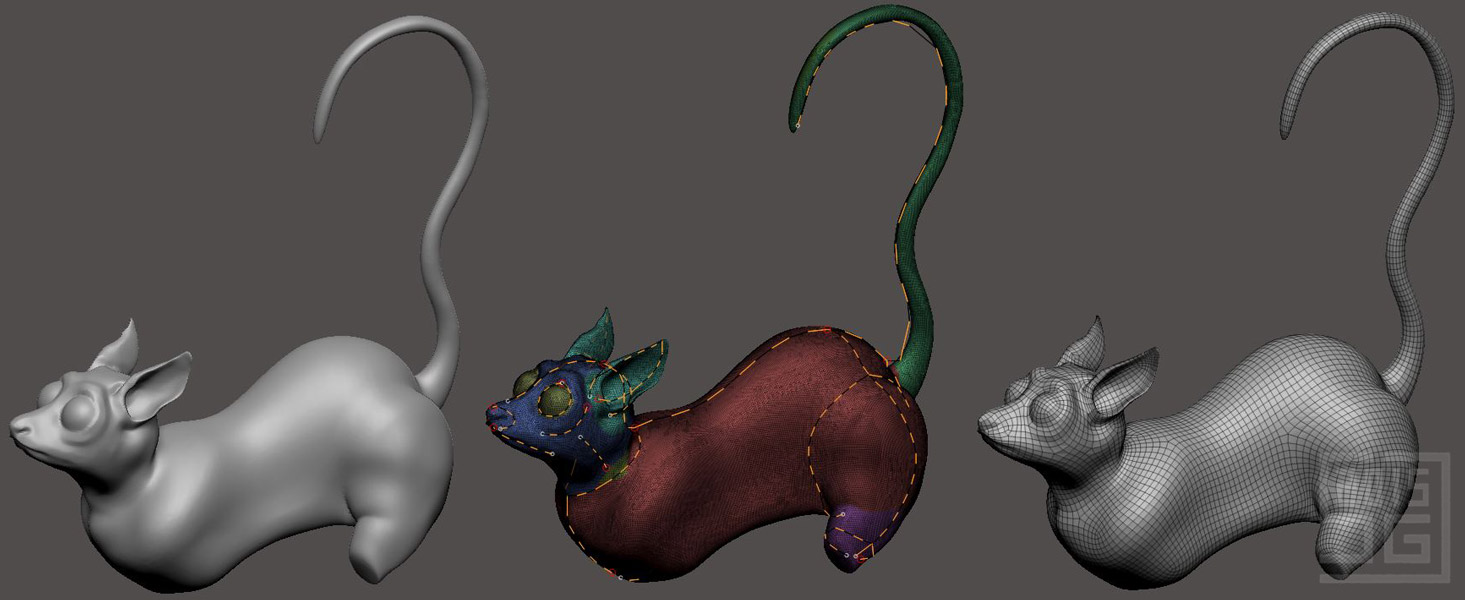

I sculpted out what I thought the hairless version should look like (left), then drew guides for the automatic retopology process (middle) after which I got a decent medium resolution mesh to work with in Maya (right).

I also painted a rough texture on the model in ZBrush, allowing it to be pretty loose and non-photorealistic because it would sit under the fur. It would also define the fur color. Then I unwrapped the UVs and exported the texture to photoshop.


I brought the model into Maya, connected the diffuse texture and set up the camera to match my working illustrator layout.


In order to get the fur on the animal, I had two options in Maya: xgen or the classic fur system. I tried working with xgen, because it is supposed to be the new workflow for fur, hair, and arbitrarily generated primitives (their words). Unfortunately it got the better of me, and I couldn't get colored workable fur. That was the point where I didn't get my cover out and published, and so began the move, the baby, and temporarily putting the project on hold.


More recently I returned to the project and began working with the classic fur system. One might expect that I started with the Racoon preset, but I actually started with the Calico Cat fur preset and did all the tweaks and changes from there.

Maya Fur Preset: Calico Cat
In photoshop, I made modified copies of the diffuse texture to be used as the fur base color, the fur tip color, as well as various grayscale maps to drive properties of the fur itself (length, baldness, bending).

The ears were the most frustrating part, and I created a whole separate fur system just for the rims of the ears. This meant painting even more grayscale maps, but I still found it more intuitive to work with than xgen.

Looks pretty ugly until render time
In terms of lighting, I thought I would need something sophisticated and clever to highlight the fur, but it turns out I was quite happy with a pretty standard Physical Sun and Sky setup, though I made sure to turn off the automatic gamma correction (Linear Workflow all the way).

Once rendered, I did some post-processing in Photoshop. I performed color correction, cleaned up some of the fur manually, added a slight warm back-lit glow to the ear, and made a few other tweaks. Then I assembled it with the text in Illustrator. I used Playfair Display as the typeface and tried to keep the composition nice and simple.


Along the way, I made sure it looked good in grayscale, since many kindle readers are black and white (I mean the devices, not the people...). And that's pretty much it! Oh yeah... nudge: http://www.amazon.com/dp/B00XS2Y6QQ

Later!
Stuart

Monday, December 1, 2014

Non-repeating noise in maya

I'm creating a large surface that I want to have very fine noise. I made a fractal texture and got a style of noise I was fairly happy with. However, to get the scale right, I needed to increase the repeatU and repeatV a ton, around 800. This creates obvious and ugly repeats.

A quick google search led me to this blog post: http://www.sigillarium.com/blog/lang/en/318/
The author describes using two animated fractals (animated just to get two different values) as input to the translateU and translateV of the original fractal. I tried a couple variations of this, but the biggest problem I found was that it destroyed the integrity (shapes) of the original fractal I created. Sometimes it made weird swirly noise, other times it just created tiny random noise.

After thinking about it a bit, I decided to pipe the outAlpha of a simple fractal into the time attribute of my crafted fractal with animated checked on. This resulted in a variation of the evolution of the fractal over the surface and really reduced any noticeable repetition, while largely maintaining the "structure" of the original fractal, because it is just evolving different parts of the surface to different times.


Hope that helps someone out and thanks to Sigillarium for the foundation of the idea.

Later,
Stuart

Friday, August 31, 2012

Egg Campfire

I'm pleased to present my final image for the Simply Maya "Egg Photography" challenge. I had a ton of fun with this one and learned quite a bit about texturing and lighting.


I wanted to make something simple but fun and interesting. The brief was to create in CG the kind of scene that people sometimes make where they draw on eggs and pose them in frying pans etc. to create funny images. You can google "egg photography" if you don't know what I mean. I tried to picture what people would be doing around a campfire if someone took a photograph, and translate that into egg world. So, I have a tealight with matches, a mini marshmallow on a chopstick, and of course eggs with pipecleaner arms sitting on popsicle sticks.

The modelling was quite simple, since I wanted to spend more time on the texturing. I used bump maps, displacement maps, specular maps, subsurface scattering materials, fur, along with a couple textures from cgtextures.com. I used point, spot, and directional lights, light linking, fur shadowing, ambient occlusion, and shader glow (boo). The egg faces were made in illustrator, and I did a few tweaks in PS after rendering. I mentioned those things in case you have questions about how I tried to achieve something, so shoot me emails or message Biocinematics on facebook. And to show that a deceptively simple scene can have a lot going on that I needed to learn about.

This is a full 1080p render, so if you want to download it and use it, e.g. as a desktop image, go right ahead. If you do want to use it for personal enjoyment and the faint watermark bothers you, just shoot me an email and I'll give you a watermarkless version as long as I know you won't post it online or share it or sell it. I know it seems silly, but I am proud of this one and want people to be able to find my other stuff if the image gets around.

Back to school on Tuesday! Whoo!

Later,
Stuart

Tuesday, August 28, 2012

Egg texturing

Just a few more days before the "egg photography" challenge deadline. I've textured everything in the small scene, and am just about to embark on the challenging issue of lighting. I really wanted to focus on lighting for this challenge, although I have learned lots about texturing and some different shaders, so that was great.


Hopefully I get the final image that I have in my head. So far I'm pleased. Fingers crossed :)

Later,
Stuart

Thursday, April 28, 2011

Gordon texturing

Hey, really quick one here. It's late-ish and I'm tired.


Gotta get this done by Saturday night. Wish me luck.

Later,
Stuart

Wednesday, April 20, 2011

HEV suit... jetpack not included


Title = lame attempt at bridging worms and hl.... anyway.
Here's an update on the suit and I put some color in so you can actually see where the parts are at the moment.


Don't forget to vote on the poll... :)

Later,
Stuart

Wednesday, April 13, 2011

What's everyone else doing?

Thought you might be interested in checking out the threads of other people's projects, so here they are: http://simplymaya.com/forum/forumdisplay.php?f=39. (I'm stwert).

I don't really have anything new to post, but I started doing some texturing a couple days ago. I think I'm going to redo quite a bit of it, (already changed some stuff) but in the absence of real updates, here goes. I'm going to ditch the blood, so don't get too worried about it...


I'm done sorting through the photos I took in Africa, and I'm going to have a slideshow this week, so that's taking up some time (just compiling with other people's photos and getting the photos in the right order and trying to trim it down, cause it's far too many at the moment). Some days there's just not enough time. I so can't wait until I can do CG full time, and then I'll come home and just play with photos or read a book without thinking about Maya... not that I dislike Maya at the moment, it's just that I feel like I have too many "hobbies" right now and not enough creative time.

But since you're such good readers, here's a couple pictures that you don't have to read. Ten Stwert bucks to anyone that can figure out what the first picture is. (It's not smoke).


Later,
Stuart

Tuesday, July 27, 2010

Two forest guys

And here's the other guy all textured up. And he stole the first guy's weapons.


I think I'll have time... animation tomorrow, rendering setup Friday, rendering overnight to Saturday, Saturday final assembly and upload. Fingers crossed :)

Later,
Stuart

Slightly painted forestman

Here's a shot at some texturing.


Not entirely happy with it yet. Looks a bit MS Paint, but then again, the lego up close looks a bit shoddy too. Haha. Anyway, gotta press forward and get the other guy done, then animate. Got kinda frustrated with the rendering this weekend; it takes quite a while to render out an image and then you need to tweak something and try again. I'm not experienced with it enough to figure out exactly what attributes change what, and where you can turn stuff on or not. And sometimes it's really hard to tell if something is turned on or not, so you have to really crank it up and then sometimes it still doesn't show up, so maybe a setting is wrong... and all that takes about 10 minutes for a couple back and forth cycles, and it still looks like poop.

But I digress. Less than a week to finish off my project... :S

Later,
Stuart

Monday, May 17, 2010

Whiplash texturing

Here's the texturing of the props essentially finished. Ignore the black chasm between the cliff pieces, still need to fix that. I'd better get onto animating soon, or my month will be up.

On a related note, saw Iron Man 2 this evening, and I must say it was pretty great. And yes, I did title my competition entry in order that more people might stop to take a look, erroneously suspecting that my animation has something to do with the bad@$$ery that is Mickey Rourke's Marvel villain. It does, however have to do with the physical trauma that is alluded to by the more common use of the word, so stay tuned for that.

On a slightly related note, as I was rifling through my cables-and-other-misc-hardware-bits box, I found that I have a pair of anaglyph blue-red stereo glasses... the cheap cardboard kind. Played around with the stereo settings in Maya which resulted in a satisfactory 3D image, but since I didn't want papercuts on my ears, I decided to upgrade. Whipped out my trusty gluegun and the Real-D glasses I smuggled home from UP, popped out the polarizing filters, cut up the cardboard frame, bit of glue here and there, and voila, a comfortable pair of anaglyph glasses that look laughably hideous. Give it a try at home! I may just post a stereo animation on youtube one of these days.

Later,
Stuart

Saturday, April 17, 2010

Finished raptor

Done and done. Here's a render of the final dino, modelled, UV mapped and textured. I'll note again that this particular model was neither modelled nor UV mapped by me, as something messed up at the end of my UV mapping, but it's virtually the same and I learned everything along the way. I would like you to note that this guy has waayyy too many teeth (cf. my model).

Along with the obvious color map, the tutorial went over adding a bump map and a specular map. These latter two maps are essentially greyscale images that tell the renderer what parts of the model to make bumpy and shiny respectively. You'll notice (maybe) that the claws and mouth are shinier than the back for example. Also there's a nice wrinkled bumpy texture overall with various added wrinkles and texture. Hope you like it.

So I'm moving onto my personal genescreen project now! Excited to get going on this. I'll be doing various tutorials along the way as I get stuck with some of the topics I'll need to know, like some rigid body dynamics (more on that later). Also a reminder to watch my video below and vote on the right if you haven't yet. I actually posted more this week than in a long time :) so catch up before I go full steam ahead with genescreen.

Later,
Stuart

Wednesday, April 14, 2010

Colorating

So no, I'm not done the texturing of the dino, but fairly far into the process. I thought the DT course was ~3-4 hrs long, but it's more like 6, plus there's a lot of "I'll start cloning out this seam to show how it's done so then you continue on for the rest of it before the next lesson", plus I'm not that used to using my tablet for this kind of stuff, plus it's even more tedious than UV mapping in parts so I can't do it for as long... all that to say that my new goal is Saturday :)

But here it is so far. It's quite shiny and smooth cause there's no bump or specular maps on it yet (that'll come later on) and there's still the eyes, teeth and tongue to work on, plus all the odds and ends of detailing and optimizing. Oh, and I should say that I had an unfortunate glitch at the very end of the UV process, so the model I'm using here is the supplied model with the project files. It's pretty much the same, but it hurts my pride to not have my model all the way through the process. It's good to have the exact same UV map as the tutorial though as I encounter the same problems and trouble-areas as the tutorial.

In other news, I found out recently that the animation I worked on for the directed study in the fall, if you recall that, got entered in UVic's Sunscreen Film Festival. I'm gonna go check it out tomorrow (on the big screen!) And after that, with any luck, I'll have a copy of it which I might be able to post on youtube.

Reminder to vote on the poll, it's pretty one-sided so far. I wonder if it was a leading question? Or more probably, people don't want to admit to watching ANTM...
Later,
Stuart