Saturday, March 2, 2013

Review of "The dark art of mental ray" Tutorial

The dark art of mental ray from SimplyMaya provides workflows intended to harness the power of render layers and passes to gain minute control over your renders. This frees you from the time-consuming process of tweaking your lighting and materials to absolute perfection within Maya.

The instructor starts by briefly covering the practical implications of linear and non-linear workflows. These topics overlap with the beginning of “PhysicallyAccurate Lighting in mental ray”. Linear lighting is an abstract concept and difficult to get your head around. This is compounded by the fact that there are numerous ways to tackle linear lighting (as with all things) in Maya. The methods given are decent, but I would have liked a bit more explanation for these, since I previously learned yet another method that makes more sense, to me at least.

The explanations of render layers and render passes are excellent. It can get very confusing when and where to use either render layers or passes, and the instructor provides helpful examples of getting results from passes, layers, and combinations of the two. Case in point, you can get ambient occlusion from a render pass or a render layer, but one of them gives you much more control. Also discussed here are layer and material overrides, accessing passes from the render viewer, selecting passes to rebuild a beauty pass, and a few pitfalls. This is important information for any serious Maya user to know.

As an aside, I find that rendering tutorials often use uninspiring geometry and scenes *cough* torus knot *cough*, and while that does get the information across, it becomes easier to imagine how principles can apply to your own projects when interesting and attractive examples are used, as in this tutorial.

I have never used Nuke before; this was my first look at it. I have quite a bit of experience learning complicated software, so it wasn't too difficult for me to keep up in the compositing sections. However, the tutorial does assume some knowledge of Nuke (and Maya), so I would not recommend this for beginners in either program. Linking the separate passes in Nuke to rebuild the rendered image shows how you can gain control over your render in post, especially with higher bit files. This is the main focus of the Nuke sections of the tutorial, i.e. linking nodes together to recompose your rendered image while gaining more and more granular control over each aspect of the image. The instructor doesn't go into depth on what attributes you can or should tweak in terms of color correction etc., but this isn't the aim of the tutorial, for better or worse.

In the same vein, creating separate render layers for each light (with associated passes) really gets to the heart of controlling your output. The Nuke setup gets more involved, but it is obviously worth the effort when you see the control you have. It doesn't stop here, as contribution maps can be built to break down the scene in terms of geometry and materials. More controlis the theme becoming clear? As contribution maps and light layers are dealt with separately, I admit I am a bit unclear on how they can be used in conjunction, for the simple reason that different types of merge nodes would have to be used in a specific order in certain groupings. Just a quick look at a network with both light layers and contribution maps would clarify this for me.

Requirements for even more granular control allow us to see how to output to custom render passes, a very helpful technique. Learning how to properly add ambient occlusion passes was another eye-opener. This is all about using mental ray the right way and to maximum effect. Finally we get to see how to create material id passes; I'm not sure how the method described compares to another method I've used with surface shaders as material overridesperhaps just passes vs. layers?

This tutorial is all about workflows for getting more out of your renders without endless re-rendering. It is abundantly clear that hitting batch render does not need to be the final step before delivery. Granular control without additional render time is a wonderful thing. But what is the cost? The instructor did not mention it, but I suspect it is disk space. Adding dozens and dozens of passes and layers adds up to eyebrow-raising file sizes. Each frame can quickly become very hefty, and even a short animation will be massive. But space is cheap and time is expensive; you can do the math.

One final thought: I am fairly confident all of the techniques shown in Nuke could be applied to After Effects, though it may be less elegant or quick to do. As I suspect more people are familiar with After Effects, I would be interested to see an addendum or short tutorial on connecting up a couple of light layers each with the required render passes. Plus ambient occlusion with the proper math. Regardless, this is an excellent tutorial that will make you think about rendering differently. I know I will be adopting many of these workflows in my current project, now that I've bought a couple more hard drives.

Thursday, February 28, 2013

Neuron Builder v2.1 (actually v0.8) - WIP

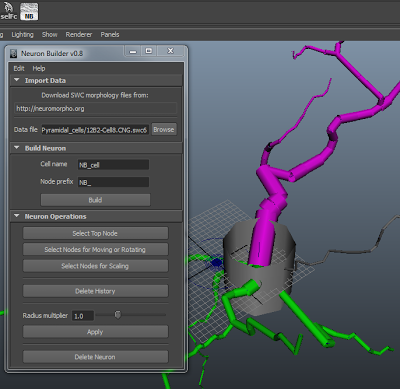
I've continued scripting the neuron builder I started in a previous post. I've had a lot of fun getting this thing working. It's one of the more satisfying things to hit enter and have thousands and thousands of commands execute spontaneously and immediately. I've posted some screenshots on facebook but if you're not on there, I'll drop them here too.

 Color coding the various projections and soma based on the neuromorpho standards.

A simple interface to start off with.

Organize the hierarchy with some simple naming conventions and check if materials already exist so the hypershade doesn't get cluttered up unecessarily.

Clean up the interface and add a link to hypothetical documentation in the help menu.

Add a radius multiplier to beef up tiny tiny dendrites. In retrospect, this wasn't that necessary, but it was a good exercise in learning some MEL.

And the current state of the situation. I've added the ability to input your own names and prefixes. There are some known issues and bugs, so I won't release it to the public yet. I'd also like to implement some more functionality to make it that much more useful. Right now it's little more than a way to get the data into the scene to use as a template. I would like it to generate usable curves and perhaps even geometry.

Later,
Stuart

Wednesday, February 27, 2013

Data Visualization Project #1

This is a piece I created for the information visualization class I'm taking. I won't really explain it because if I've done my job, it's self-explanatory, at least with the text on the piece itself (as long as it's big enough to read).


Clicken to embiggen.

Later,
Stuart

Tuesday, February 12, 2013

Neuron builder - v2 WIP

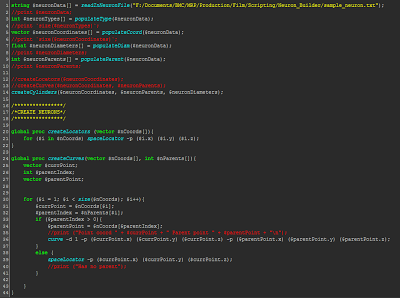
My supervisor showed me a type of data in a simple text format that encodes the branching structures of neurons. He thought it would be interesting to try to create a script that would import this data into Maya and build a 3D representation of it. I thought that was a neat challenge, since I was already trying to develop ways to procedurally model neurons.

This is where I'm at so far, creating simple cylinders from the data:


This is a section of the code. It's a bit tedious switching back and forth from MEL to Javascript for Unity, but I keep learning new things, and it's always satisfying to click a button and have hundreds of commands executed instantaneously.


Later,
Stuart

Tuesday, February 5, 2013

RtIN - First shot stills

I've rendered out the first shot (not the shot that comes first in the animation). Here are a couple of stills from it. I aimed for a high-key, clean laboratory feeling. Despite rather lengthy render times, I ended up with some aliasing problems, so I'll likely be re-rendering at some point in the future. For the time being, I'm moving on to the next shot so I can continue getting assets completed.


Later,
Stuart

Friday, January 25, 2013

RtIN - Petri Dish

A petri dish! I've modelled a bunch of other stuff but I haven't rendered out any WIP images yet. I could post screenshots, but I kind of like the higher production look, even if it means I post less often. Sorry :(


Later,
Stuart

Thursday, January 17, 2013

RtIN - Monitor

Production for "Recording the Illuminated Neuron" has officially begun (well a couple weeks ago) and I've gotten something of a start on modelling. I've spent a bit of time working on getting a WIP rendering system set up so it's easy for me to render out and post WIP images. Still lots of opportunity to tweak the system but I'm happy with the results so far using sIBL from hdrlabs.com.

I haven't decided whether I will want to post renders without wires or with, most of the time. Here are two with wires on top and one without.


Later,
Stuart

Sunday, January 6, 2013

New year, new semester, treefrog

It's 2013 and I'm jumping back into the swing of things for the final semester of the program. How is that even possible? Everything is very much more scary this side of Christmas, but I'm really looking forward to it too.

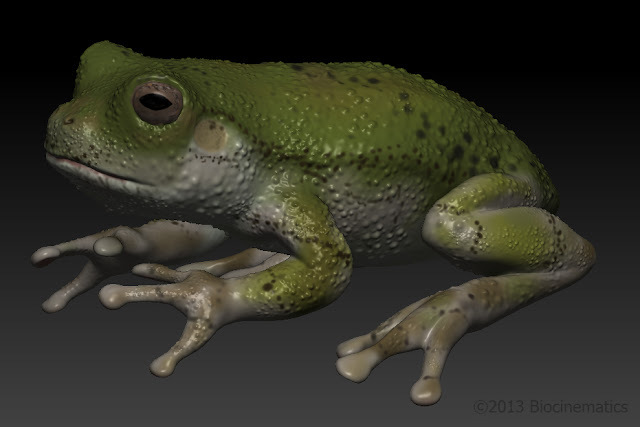
I made this treefrog in ZBrush (Hyla versicolor). It's a screenshot, not a proper render (I need to figure out how to do that in Z). I'd like to do more animal and nature scenes in 3D, so this was a small attempt to get into that a bit more. There's still so much to learn, it's rather overwhelming. But it's fun.


Happy New Year,
Stuart

P.S. I know I promised a Hobbit review before Christmas... but the plane landed before I'd written more than a paragraph, so I may or may not ever get round to finishing it. Sorry. Got to pick my battles.

Tuesday, December 11, 2012

MRP Animatic

As the semester comes to a close, I've decided to post my 2D animatic for the 3D animation in Maya I will be creating for my Master's Research Project. I suppose I still haven't explained my project so this is a good a chance as any.

DISCLAIMER: If you don't want to see my animation until its beautiful, 3D, final form, then don't watch the animatic. It's very visually rough, the narration is preliminary in my terrible voice, and everything is a spoiler for the final piece.

In February, I needed to start looking at selecting a project for my MRP, the main component of the MSc in Biomedical Communications I am pursuing. I saw a presentation on a very interesting new tool in neuroscience and chose it as the topic of study. The brief for this topic is to explain the function and usefulness of the newly developed probe to potentially interested parties, including researchers and graduate students. The "micro-optrode" represents the possibility for unprecedented (if I can use such a bold word) examination of individual neurons in living brains. For the time being, this research is being done on mice and rats. I will let the animatic (hopefully) explain the rest...


I will also be building an interactive simulator for the probe to be housed on a website along with the animation. Starting in January, I'll be in production for this animation.

Merry Christmas!
Stuart

Sunday, November 18, 2012

Metastatic Bone Cancer process

I'm hopefully about ready to start rendering this 2-page illustration for the pathology course. My very first idea was something along these lines:


and it has evolved to this point:


I used maya to construct the rough shape of the rib to get a better perspective view and used it as a template. Booleans were used to cut out windows in the rib, and because the mesh wasn't really getting used for anything itself, I didn't mind that the topology was a mess from the booleans.

Later,
Stuart