Today I uploaded the first three lecture chunks (for lack of a better word) of the course I taught this spring on YouTube free for anyone to watch.
The course was offered through the Masters of Science in Biomedical Communications program, the Master's program that I completed two years ago. It covers intermediate and advanced Maya topics, or more specifically, pretty much everything that isn't modelling and texturing.
The recorded lectures are largely Maya demonstrations, tutorials, and explanations that focus on the application of a Maya toolset or technique for biomedical content. Admittedly some of the demos are less biomedical and more "let's use some spheres because it's simpler to demonstrate". They assume some prior knowledge of Maya and a decent understanding of the interface and modelling tools.
Lecture topics (that I will be posting regularly) include Animation, Rigging, nParticles, Optimization, nHair, nCloth, Fluids, Motion Tracking and Compositing with AE, and MEL scripting. I very much hope that you will subscribe to my YouTube channel to view the tutorials as soon as they are posted. There will be 35 videos of varying lengths in the series, so lots of content to come.
Thanks for checking them out! I hope they are informative and useful, and if so, please share them around.
Later,
Stuart

Tuesday, June 30, 2015

Sunday, June 28, 2015
Science Photography EdX Course - Week 1
I registered for a Science and Engineering Photography course offered by EdX since I am quite interested in science and nature photography, I've just purchased a macro lens, and I really like the work the instructor has done. Today I completed the first assignment. I will be working with the same object for the duration of the course, so it was important that I choose something interesting and had some significance to me. Fortunately my good wife thought to suggest my great-grandfather's pocket watch, which I inherited after he passed away several years ago at the age of 102. This wasn't his Watch (with a capital W) in the sense of it being the heirloom, since he had several watches and was more of a wrist-watch type of guy, but it still has plenty of significance for me and looking at it now, it could be as old as late 19th century though more likely c. 1930-50. Perhaps I'll be able to discover exactly when it was made while doing this course.
The first assignment was not to use a camera, rather a flatbed scanner. This ended up being a very interesting technique and something I hope to return to in the future. My scanner is capable of scanning at up to 12800 dpi, so ended up with some very large images. A bit overkill, but here is a very scaled down image.

Aside from creating some nice images of the watch face, I stumbled on a pretty surprising effect. Look at the second hand (the inset dial). What is happening here? All the evidence is already in the image, but I'll give a couple of clues. 1) The watch still works 2) The scanner head moves from the top of the image to the bottom. Let me know your analysis in the comments.

And finally, because my artist sister-in-law was over, she noticed the cool moving second hand effect and asked what would happen if I moved the whole watch during the scan. A scan and a bit of photoshop processing later (though not as much as you might expect for this image), I arrived at the below photo.
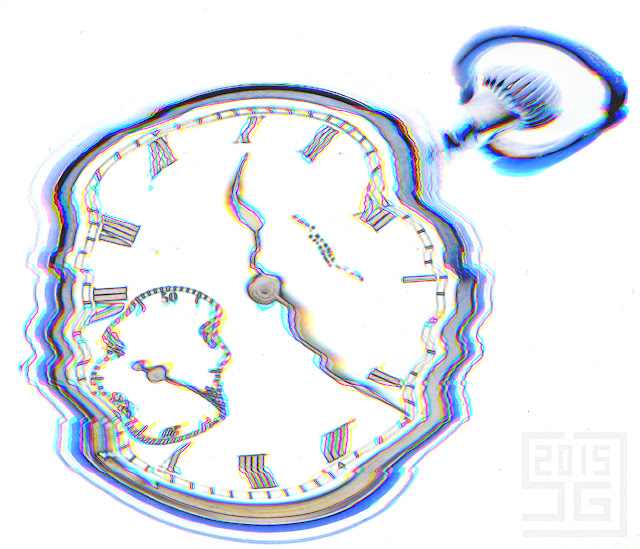

The first assignment was not to use a camera, rather a flatbed scanner. This ended up being a very interesting technique and something I hope to return to in the future. My scanner is capable of scanning at up to 12800 dpi, so ended up with some very large images. A bit overkill, but here is a very scaled down image.

Aside from creating some nice images of the watch face, I stumbled on a pretty surprising effect. Look at the second hand (the inset dial). What is happening here? All the evidence is already in the image, but I'll give a couple of clues. 1) The watch still works 2) The scanner head moves from the top of the image to the bottom. Let me know your analysis in the comments.

And finally, because my artist sister-in-law was over, she noticed the cool moving second hand effect and asked what would happen if I moved the whole watch during the scan. A scan and a bit of photoshop processing later (though not as much as you might expect for this image), I arrived at the below photo.

I just love the swirly chromatic strands on the hour and minute hands.

This course, while very exciting and about which I will be posting frequently, is not the special announcement I was going to make, so stay tuned again for the actual announcement.
Later,
Stuart
Saturday, June 27, 2015
Molecular Visualization Principles #1-3
As a part of my research work, we are developing some principles, guidelines, or considerations for visualizing molecules in biological systems. It's hard to know exactly how to phrase and frame these, because they are not hard and fast rules; however, they may be helpful in creating more accurate depictions of biomolecules.
Each principle is presented as a short pair of animations. The Treatment A's do not adhere to the principle whereas the Treatment B's do. So far, I have created examples to demonstrate three of the principles, with more coming.
Principle 01 is "Leave some behind". It conveys the idea that typically not all molecules are consumed in a process. For example, there may be more subunits present in the environment than ultimately bind together in a biological complex. This example shows a virus capsid assembling. Note that many of the actual mechanics of capsid assembly (i.e. ideas that may constitute other principles) are ignored or simplified for the sake of clarity. One might declare some irony or hypocrisy here, however it is important that we build the framework for the principles individually before considering how they might be combined in real-world visualization cases.
Principle 02 is "Use Random Walks". It conveys the idea that molecules move randomly due to collisions in a crowded environment. For example, an Arp2/3 complex moves erratically before binding to an actin filament.
Principle 03 is "Add Non-binding Collisions". It conveys the idea that molecules might encounter each other with unproductive orientations and conformations multiple times before a successful binding event occurs. For example, Sos and Ras might collide a number of times before their orientations result in tight binding.
I'll be announcing an exciting new set of content very soon, so check back in a couple of days for that.
Later,
Stuart
Each principle is presented as a short pair of animations. The Treatment A's do not adhere to the principle whereas the Treatment B's do. So far, I have created examples to demonstrate three of the principles, with more coming.
Principle 01 is "Leave some behind". It conveys the idea that typically not all molecules are consumed in a process. For example, there may be more subunits present in the environment than ultimately bind together in a biological complex. This example shows a virus capsid assembling. Note that many of the actual mechanics of capsid assembly (i.e. ideas that may constitute other principles) are ignored or simplified for the sake of clarity. One might declare some irony or hypocrisy here, however it is important that we build the framework for the principles individually before considering how they might be combined in real-world visualization cases.
Principle 02 is "Use Random Walks". It conveys the idea that molecules move randomly due to collisions in a crowded environment. For example, an Arp2/3 complex moves erratically before binding to an actin filament.
Principle 03 is "Add Non-binding Collisions". It conveys the idea that molecules might encounter each other with unproductive orientations and conformations multiple times before a successful binding event occurs. For example, Sos and Ras might collide a number of times before their orientations result in tight binding.
I'll be announcing an exciting new set of content very soon, so check back in a couple of days for that.
Later,
Stuart
Saturday, May 30, 2015
Molecular shading
Finally some biomedical visualization, right? These images are work in progress for a few animations I am working on to demonstrate in a simple way some important concepts of molecular behaviour. This is from my work, as opposed to a personal project.


When creating the molecular shaders, I had two important ideas to consider. The first was that the form of the individual molecules was not very important. They should be treated simply and cleanly. I considered going as far as flat shading or toon shading, but decided against it in favor of a softer representation with a slight indication of form.
The second was that contact between molecules and their spatial relationship should be clear. Ambient occlusion is a great candidate for this, but I didn't want the AO to show form within the molecule, so I resolved this dilemma using an miLabel attribute on the objects, separate AO shaders on molecules, and using the idnonself attribute of the mib_amb_occlusion shader.
Finally I wanted to add just a bit of aesthetic interest to the molecules, so I gave them a slight sheen of a different color using a samplerInfo.facingRatio to ramp to lambert.color to achieve the effect. I'm rendering each of these components of the overall look in different render layers so I can play with the strengths of each.
For the lighting, I used a single very large area light with soft shadows and final gather that employed an IBL sphere mapped with a colored ramp. See if you can figure out the ramp colors.
Later,
Stuart


When creating the molecular shaders, I had two important ideas to consider. The first was that the form of the individual molecules was not very important. They should be treated simply and cleanly. I considered going as far as flat shading or toon shading, but decided against it in favor of a softer representation with a slight indication of form.
The second was that contact between molecules and their spatial relationship should be clear. Ambient occlusion is a great candidate for this, but I didn't want the AO to show form within the molecule, so I resolved this dilemma using an miLabel attribute on the objects, separate AO shaders on molecules, and using the idnonself attribute of the mib_amb_occlusion shader.
Finally I wanted to add just a bit of aesthetic interest to the molecules, so I gave them a slight sheen of a different color using a samplerInfo.facingRatio to ramp to lambert.color to achieve the effect. I'm rendering each of these components of the overall look in different render layers so I can play with the strengths of each.
For the lighting, I used a single very large area light with soft shadows and final gather that employed an IBL sphere mapped with a colored ramp. See if you can figure out the ramp colors.
Later,
Stuart
Friday, May 22, 2015
SaD - Special Preview
Last week I released my novel Severing a Dendrite. Amazon provides a short sample of the book you can read before buying. However, I want to share the opportunity to read a longer section, five chapters (over 50 pages in the pdf), before potentially buying the book. Here are a few different formats for your reading pleasure.


If you are wanting to read these previews on a device (or buy the Amazon book), and aren't sure if it will work or how to go about it, send me an email (stuart@biocinematics.com) and I will help out as best I can.
If you are a non-kindle user and you really want the whole book in EPUB format, shoot me an email (stuart@biocinematics.com) with a screenshot of your amazon receipt and I'll hook you up with an EPUB file.
Thank you so much to everyone that has purchased the book so far. Of much greater importance than the two bucks I receive, I'm thrilled that someone is reading the story I wrote, and I'm very curious to hear what people think. If you've read all or part of it, I would love a) an amazon review, b) a comment below with your thoughts, or c) an email with your honest opinion.
Thanks again,
Stuart
The Special Preview in PDF
The Special Preview in MOBI (Kindle format; use Send to Kindle)
The Special Preview in EPUB (other eReaders)
If you are wanting to read these previews on a device (or buy the Amazon book), and aren't sure if it will work or how to go about it, send me an email (stuart@biocinematics.com) and I will help out as best I can.
If you are a non-kindle user and you really want the whole book in EPUB format, shoot me an email (stuart@biocinematics.com) with a screenshot of your amazon receipt and I'll hook you up with an EPUB file.
Thank you so much to everyone that has purchased the book so far. Of much greater importance than the two bucks I receive, I'm thrilled that someone is reading the story I wrote, and I'm very curious to hear what people think. If you've read all or part of it, I would love a) an amazon review, b) a comment below with your thoughts, or c) an email with your honest opinion.
Thanks again,
Stuart
Monday, May 18, 2015
SaD - About the Cover
I released my first novel two days ago (http://www.amazon.com/dp/B00XS2Y6QQ) and interestingly, the cover was one of the most challenging parts (see the previous post for a nice look at the cover). I played around with a couple of 2D geometric/graphical ideas and then discarded those in favor of a 3D recreation of one of the characters from the book.
The book is full of plants and animals similar yet dissimilar to those we are currently surrounded by. I wanted to capture a bit of mystery, a bit of familiarity, and a bit of softness and appealing texture. An image came to mind of an animal with a long curved tail, a back, and ears visible almost in silhouette. Perhaps someone else has done this and I subconsciously borrowed the idea, but I think it suits the feel of the novel. If you read the book, you'll know who the character is ( buy it ).
ZBrush is a great tool for messing around with ideas in digital clay, and dynamesh allows you to work without worrying about edge flow, poly counts, or anything technical.

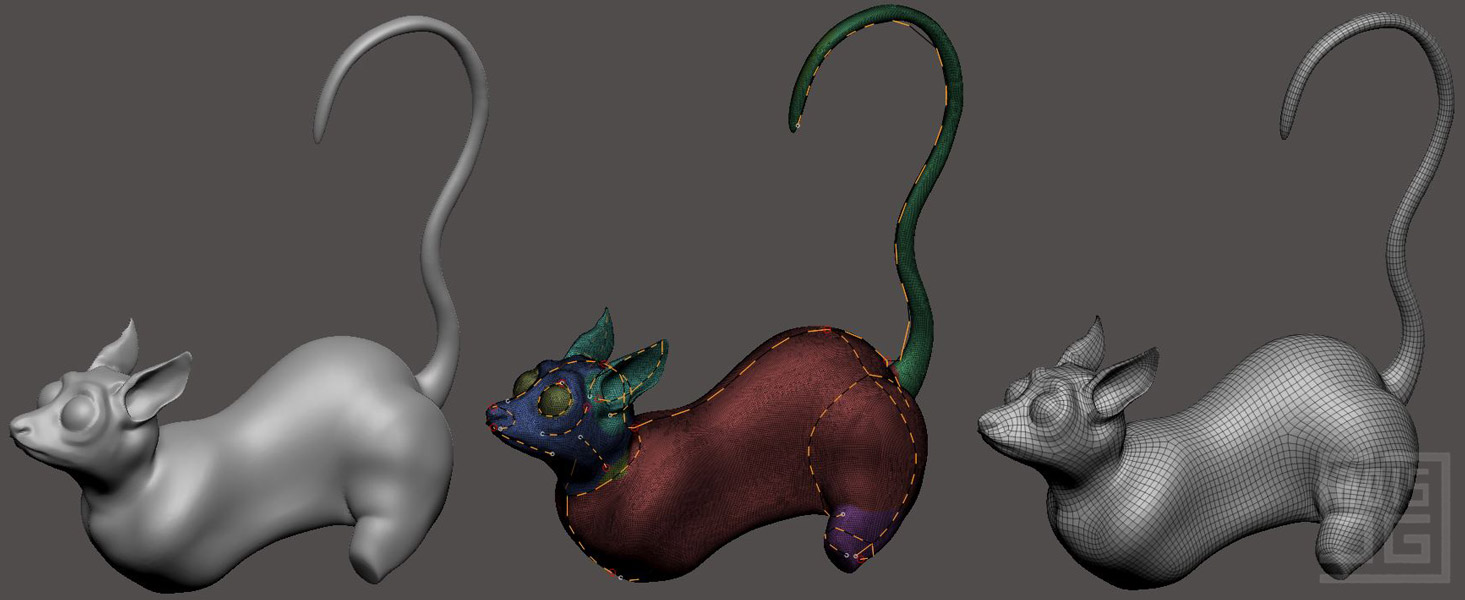
I sculpted out what I thought the hairless version should look like (left), then drew guides for the automatic retopology process (middle) after which I got a decent medium resolution mesh to work with in Maya (right).
I also painted a rough texture on the model in ZBrush, allowing it to be pretty loose and non-photorealistic because it would sit under the fur. It would also define the fur color. Then I unwrapped the UVs and exported the texture to photoshop.

I brought the model into Maya, connected the diffuse texture and set up the camera to match my working illustrator layout.

In order to get the fur on the animal, I had two options in Maya: xgen or the classic fur system. I tried working with xgen, because it is supposed to be the new workflow for fur, hair, and arbitrarily generated primitives (their words). Unfortunately it got the better of me, and I couldn't get colored workable fur. That was the point where I didn't get my cover out and published, and so began the move, the baby, and temporarily putting the project on hold.

More recently I returned to the project and began working with the classic fur system. One might expect that I started with the Racoon preset, but I actually started with the Calico Cat fur preset and did all the tweaks and changes from there.
In photoshop, I made modified copies of the diffuse texture to be used as the fur base color, the fur tip color, as well as various grayscale maps to drive properties of the fur itself (length, baldness, bending).

The ears were the most frustrating part, and I created a whole separate fur system just for the rims of the ears. This meant painting even more grayscale maps, but I still found it more intuitive to work with than xgen.
Once rendered, I did some post-processing in Photoshop. I performed color correction, cleaned up some of the fur manually, added a slight warm back-lit glow to the ear, and made a few other tweaks. Then I assembled it with the text in Illustrator. I used Playfair Display as the typeface and tried to keep the composition nice and simple.

Along the way, I made sure it looked good in grayscale, since many kindle readers are black and white (I mean the devices, not the people...). And that's pretty much it! Oh yeah... nudge: http://www.amazon.com/dp/B00XS2Y6QQ
Later!
Stuart
The book is full of plants and animals similar yet dissimilar to those we are currently surrounded by. I wanted to capture a bit of mystery, a bit of familiarity, and a bit of softness and appealing texture. An image came to mind of an animal with a long curved tail, a back, and ears visible almost in silhouette. Perhaps someone else has done this and I subconsciously borrowed the idea, but I think it suits the feel of the novel. If you read the book, you'll know who the character is (
ZBrush is a great tool for messing around with ideas in digital clay, and dynamesh allows you to work without worrying about edge flow, poly counts, or anything technical.
I sculpted out what I thought the hairless version should look like (left), then drew guides for the automatic retopology process (middle) after which I got a decent medium resolution mesh to work with in Maya (right).
I also painted a rough texture on the model in ZBrush, allowing it to be pretty loose and non-photorealistic because it would sit under the fur. It would also define the fur color. Then I unwrapped the UVs and exported the texture to photoshop.

I brought the model into Maya, connected the diffuse texture and set up the camera to match my working illustrator layout.

In order to get the fur on the animal, I had two options in Maya: xgen or the classic fur system. I tried working with xgen, because it is supposed to be the new workflow for fur, hair, and arbitrarily generated primitives (their words). Unfortunately it got the better of me, and I couldn't get colored workable fur. That was the point where I didn't get my cover out and published, and so began the move, the baby, and temporarily putting the project on hold.

More recently I returned to the project and began working with the classic fur system. One might expect that I started with the Racoon preset, but I actually started with the Calico Cat fur preset and did all the tweaks and changes from there.
 |
| Maya Fur Preset: Calico Cat |

The ears were the most frustrating part, and I created a whole separate fur system just for the rims of the ears. This meant painting even more grayscale maps, but I still found it more intuitive to work with than xgen.
 |
| Looks pretty ugly until render time |
In terms of lighting, I thought I would need something sophisticated and clever to highlight the fur, but it turns out I was quite happy with a pretty standard Physical Sun and Sky setup, though I made sure to turn off the automatic gamma correction (Linear Workflow all the way).
Once rendered, I did some post-processing in Photoshop. I performed color correction, cleaned up some of the fur manually, added a slight warm back-lit glow to the ear, and made a few other tweaks. Then I assembled it with the text in Illustrator. I used Playfair Display as the typeface and tried to keep the composition nice and simple.

Along the way, I made sure it looked good in grayscale, since many kindle readers are black and white (I mean the devices, not the people...). And that's pretty much it! Oh yeah... nudge: http://www.amazon.com/dp/B00XS2Y6QQ
Later!
Stuart
Saturday, May 16, 2015
Severing a Dendrite - Now Available
I am very proud to announce that my first (and potentially only) novel is now available exclusively on the Amazon Kindle Store. I will be posting the first five chapters in pdf, mobi, and epub formats on my blog soon, but you can read the first chapter here if you want to preview the book before buying. Only $2.99 in the US and Canada! We Canadians have enough frustration with mismatched book prices that I manually set it the same as the US :)

This has been a tremendously fun undertaking. My timeline has perhaps been unorthodox. One month writing (NaNoWriMo), one month editing (five years later) and then about six months on the cover. To be fair, the cover was bits of time among a move and a new baby and all that. But it is finally complete!
It might be interesting to take brief look at the progress of this book on my blog:
Yesterday, I had a computer failure, which underscored the importance of backing up data and how ephemeral computer hardware is. In turns out I have a decent backup system, allowing Publishing Day to move forward as planned (okay, not the original Nov 30 publishing day, but the deadline I set for myself last week). And the drive didn't physically and irreparably fail (yet), but I'm going to use it as an impetus for you to drop a few dollars on my book. Maybe if it gets shared around and enough people buy it, I can scrape sufficient royalties together to buy a new SSD for my computer. Who knows? Thanks in advance.
Happy reading,
Stuart
Available at

and all the global amazon sites

This has been a tremendously fun undertaking. My timeline has perhaps been unorthodox. One month writing (NaNoWriMo), one month editing (five years later) and then about six months on the cover. To be fair, the cover was bits of time among a move and a new baby and all that. But it is finally complete!
It might be interesting to take brief look at the progress of this book on my blog:
So the cover ended up being the real bottleneck and it took a long time to get a satisfactory result close to what I had in mind. I'll make a blog post about the creation of the cover, since I am pleased with how it turned out in the end. So, back to back publication posts! I'm not sure which one I'm more pleased about. I promise I'll return to making posts about actual images and animations and that sort of thing soon.
Yesterday, I had a computer failure, which underscored the importance of backing up data and how ephemeral computer hardware is. In turns out I have a decent backup system, allowing Publishing Day to move forward as planned (okay, not the original Nov 30 publishing day, but the deadline I set for myself last week). And the drive didn't physically and irreparably fail (yet), but I'm going to use it as an impetus for you to drop a few dollars on my book. Maybe if it gets shared around and enough people buy it, I can scrape sufficient royalties together to buy a new SSD for my computer. Who knows? Thanks in advance.
Happy reading,
Stuart
Thursday, April 2, 2015
Nature Methods Publication
The April issue of Nature Methods includes a publication (doi:10.1038/nmeth.3334) that I wrote with support from my supervisors regarding the topic of including citations with scientific animations. I'm very pleased that it was accepted at a journal with such high standing and repute. I hope the ideas get some traction in the scientific and biomedical animation communities.

I submitted an image for consideration of the cover. Unfortunately, it wasn't accepted as the cover for the issue, but I'm still pleased with how it turned out. It's based on an earlier 70S Ribosome image, but instead of depicting the components of the ribosome, it depicts how different data sources can be brought together, adapted, and supplemented with artistic considerations to create a scientific illustration. I would guess that many people do not know the breadth of decisions that are made for even a simple illustration.

Here are a couple of details from the piece.


I apologize for the long absence on this blog. I have been (and am) on parental leave with my new son. It has been a fantastic time with new priorities. I hope I will be able to once again update this blog frequently, with some exciting new projects in mind. Thank you for your readership and sharing, and I will write again (and illustrate) more soon.
Later,
Stuart
I submitted an image for consideration of the cover. Unfortunately, it wasn't accepted as the cover for the issue, but I'm still pleased with how it turned out. It's based on an earlier 70S Ribosome image, but instead of depicting the components of the ribosome, it depicts how different data sources can be brought together, adapted, and supplemented with artistic considerations to create a scientific illustration. I would guess that many people do not know the breadth of decisions that are made for even a simple illustration.
Here are a couple of details from the piece.
I apologize for the long absence on this blog. I have been (and am) on parental leave with my new son. It has been a fantastic time with new priorities. I hope I will be able to once again update this blog frequently, with some exciting new projects in mind. Thank you for your readership and sharing, and I will write again (and illustrate) more soon.
Later,
Stuart
Friday, January 23, 2015
Control curves template
I made another simple little utility/template file for rigging purposes. It's pretty common to have to make control curves of various shapes to use in rigs.


The control curves each have additional attributes that let you set the drawing color override, as in the image above, which is a nice visual indicator for rigs.
Hope that's useful for someone.
Later,
Stuart
Download the maya template here (it is a 2015 file, but checking ignore version should be okay): http://goo.gl/h3rNmU
All you need to do for your rig file is import the maya file (merge into the default namespace), open up the template group, select the one you want, and then run this script:
string $dupCtrlList[] = `duplicate -rr`; //duplicate control
for ($duplicateCtrl in $dupCtrlList){
parent -w $duplicateCtrl; //unparent from template group
editDisplayLayerMembers -noRecurse "defaultLayer" $duplicateCtrl; //remove from display layer
string $shapeNodes[] = `listRelatives -s -path $duplicateCtrl`; //get list of shape nodes
for ($shape in $shapeNodes){ //for each shape node, connect display overrides
connectAttr -f ($duplicateCtrl + ".wireOverride") ($shape + ".overrideEnabled");
connectAttr -f ($duplicateCtrl + ".wireColor") ($shape + ".overrideColor");
}
}
I've put this script on my shelf with this nice little circle icon:for ($duplicateCtrl in $dupCtrlList){
parent -w $duplicateCtrl; //unparent from template group
editDisplayLayerMembers -noRecurse "defaultLayer" $duplicateCtrl; //remove from display layer
string $shapeNodes[] = `listRelatives -s -path $duplicateCtrl`; //get list of shape nodes
for ($shape in $shapeNodes){ //for each shape node, connect display overrides
connectAttr -f ($duplicateCtrl + ".wireOverride") ($shape + ".overrideEnabled");
connectAttr -f ($duplicateCtrl + ".wireColor") ($shape + ".overrideColor");
}
}
The control curves each have additional attributes that let you set the drawing color override, as in the image above, which is a nice visual indicator for rigs.
Hope that's useful for someone.
Later,
Stuart
Thursday, January 22, 2015
Ant sculpting updates
The ant is still progressing along, in and amongst other things. The base model is finished, provided there are no revisions for the gross anatomy.


I've retopologized it using ZRemesher (process as below), and am working on fixing the UV maps in Maya. Some strangeness there, but shall press on.

Then it's detailing, texturing, finishing the rig and getting everything animation ready.
Later,
Stuart
I've retopologized it using ZRemesher (process as below), and am working on fixing the UV maps in Maya. Some strangeness there, but shall press on.
Then it's detailing, texturing, finishing the rig and getting everything animation ready.
Later,
Stuart
Subscribe to:
Posts (Atom)