Done and done. Here's a render of the final dino, modelled, UV mapped and textured. I'll note again that this particular model was neither modelled nor UV mapped by me, as something messed up at the end of my UV mapping, but it's virtually the same and I learned everything along the way. I would like you to note that this guy has waayyy too many teeth (cf. my model).
Along with the obvious color map, the tutorial went over adding a bump map and a specular map. These latter two maps are essentially greyscale images that tell the renderer what parts of the model to make bumpy and shiny respectively. You'll notice (maybe) that the claws and mouth are shinier than the back for example. Also there's a nice wrinkled bumpy texture overall with various added wrinkles and texture. Hope you like it.
So I'm moving onto my personal genescreen project now! Excited to get going on this. I'll be doing various tutorials along the way as I get stuck with some of the topics I'll need to know, like some rigid body dynamics (more on that later). Also a reminder to watch my video below and vote on the right if you haven't yet. I actually posted more this week than in a long time :) so catch up before I go full steam ahead with genescreen.
Later,
Stuart
Saturday, April 17, 2010
Battle Without Honour or Humanity
I finally got permission (more or less) to post the animation that I worked on in the fall (with a few other people). More to the point, I finally got the animation. Had a really good time at the UVic Sunscreen Film Festival. Didn't win anything, but considering I didn't know about it two days before hand, I didn't have high expectations. I did vote for a film for the audience award that ended up winning Best Direction, Best Cinematography and the Audience Award (so I feel like I've got an eye for it now ;) ). Go to my channel (link on the right) for the 720p version! If you hear a very much lot about 720p and don't really know what it is (don't worry, lots of people don't), that just refers to the vertical resolution (basically 1280x720 pixels/frame), and p stands for progressive, which means it's not interlaced, and I'll leave that there.
Battle Without Honour or Humanity
Edit: I was going to embed it, but this blog layout is just so narrow that I have to shrink it by more than youtube's default smallest size.
Hope you like it, and if you do, hit the like button on youtube. For the animation, it's only fair to tell you that I animated about the last 15 seconds of the short. I did a lot of the room layout, modelling and texturing, and I did some rigging as well as a lot of organizational setup, clean-up and stuff.
Still plugging away on the dino texturing, so I'll post an update tomorrow hopefully.
Later,
Stuart
Battle Without Honour or Humanity
Edit: I was going to embed it, but this blog layout is just so narrow that I have to shrink it by more than youtube's default smallest size.
Hope you like it, and if you do, hit the like button on youtube. For the animation, it's only fair to tell you that I animated about the last 15 seconds of the short. I did a lot of the room layout, modelling and texturing, and I did some rigging as well as a lot of organizational setup, clean-up and stuff.
Still plugging away on the dino texturing, so I'll post an update tomorrow hopefully.
Later,
Stuart
Wednesday, April 14, 2010
Colorating
So no, I'm not done the texturing of the dino, but fairly far into the process. I thought the DT course was ~3-4 hrs long, but it's more like 6, plus there's a lot of "I'll start cloning out this seam to show how it's done so then you continue on for the rest of it before the next lesson", plus I'm not that used to using my tablet for this kind of stuff, plus it's even more tedious than UV mapping in parts so I can't do it for as long... all that to say that my new goal is Saturday :)
But here it is so far. It's quite shiny and smooth cause there's no bump or specular maps on it yet (that'll come later on) and there's still the eyes, teeth and tongue to work on, plus all the odds and ends of detailing and optimizing. Oh, and I should say that I had an unfortunate glitch at the very end of the UV process, so the model I'm using here is the supplied model with the project files. It's pretty much the same, but it hurts my pride to not have my model all the way through the process. It's good to have the exact same UV map as the tutorial though as I encounter the same problems and trouble-areas as the tutorial.
In other news, I found out recently that the animation I worked on for the directed study in the fall, if you recall that, got entered in UVic's Sunscreen Film Festival. I'm gonna go check it out tomorrow (on the big screen!) And after that, with any luck, I'll have a copy of it which I might be able to post on youtube.
Reminder to vote on the poll, it's pretty one-sided so far. I wonder if it was a leading question? Or more probably, people don't want to admit to watching ANTM...
Later,
Stuart
But here it is so far. It's quite shiny and smooth cause there's no bump or specular maps on it yet (that'll come later on) and there's still the eyes, teeth and tongue to work on, plus all the odds and ends of detailing and optimizing. Oh, and I should say that I had an unfortunate glitch at the very end of the UV process, so the model I'm using here is the supplied model with the project files. It's pretty much the same, but it hurts my pride to not have my model all the way through the process. It's good to have the exact same UV map as the tutorial though as I encounter the same problems and trouble-areas as the tutorial.
In other news, I found out recently that the animation I worked on for the directed study in the fall, if you recall that, got entered in UVic's Sunscreen Film Festival. I'm gonna go check it out tomorrow (on the big screen!) And after that, with any luck, I'll have a copy of it which I might be able to post on youtube.
Reminder to vote on the poll, it's pretty one-sided so far. I wonder if it was a leading question? Or more probably, people don't want to admit to watching ANTM...
Later,
Stuart
Sunday, April 11, 2010
UVed dino (= mild scale cancer)
It's been a little while of not working on maya, but yesterday I got a good bunch done on my dino. I don't really know how to balance the technical side of what I'm doing with just showing you a pic of something. Maybe I am too technical for the laipersons, but I don't know how interested people are in the technical side. It's true that most of what I'm learning is more technical than artistic at this point, so that's what I share. I've set up a poll on the right, so please vote for how you want me to discuss things in the future (if you have a comment about the poll, feel free to share your thoughts in response to this post).
Anyway, on to the UV stuff. This is a bit of an abstract area, so I'll go through it with a few pictures (yay pics!). In 3D space, there are XYZ coordinates. Now, if you want to use photoshop or something to texture your grey model with detailed strokes, you can't use photoshop to paint in 3D space of course (*yes you can, CS4 introduced that...* *shhh, just ignore that* *ahem, go on*) Ok, so there is a different coordinate system called U and V that exist in 2D space. The tricky part is peeling apart your 3D model and flattening it out. It's not so hard to just rip bits off of your model (digitally speaking) and smash them into 2D. However, you don't want any overlapping bits, cause then if you paint in one spot over the UV map, it'll appear in two spots on the model in 3D, see?
Imagine peeling apart an orange. If you pulled off a whole bunch of pieces, you could flatten them out and paint over them, but once the peel is reassembled, you'd have many seams, which are hard to transition over with paint. So we want to avoid overlapping pieces, and minimize the seams. Great! But there's a third issue... (*groan*) If you look at a map of Canada, it often appears about the same size as the States or a bit bigger. But everyone knows how massively huge Canada is... so what's the deal? Well as the ancient Egyptians figured out, the earth is round and maps are flat (*ok, so maybe it wasn't them... who knows anyway*). There will be distortion in looking at a 2D texture of a 3D object and vice versa. So minimize distortion and seams, no overlapping bits. Off we go!!!
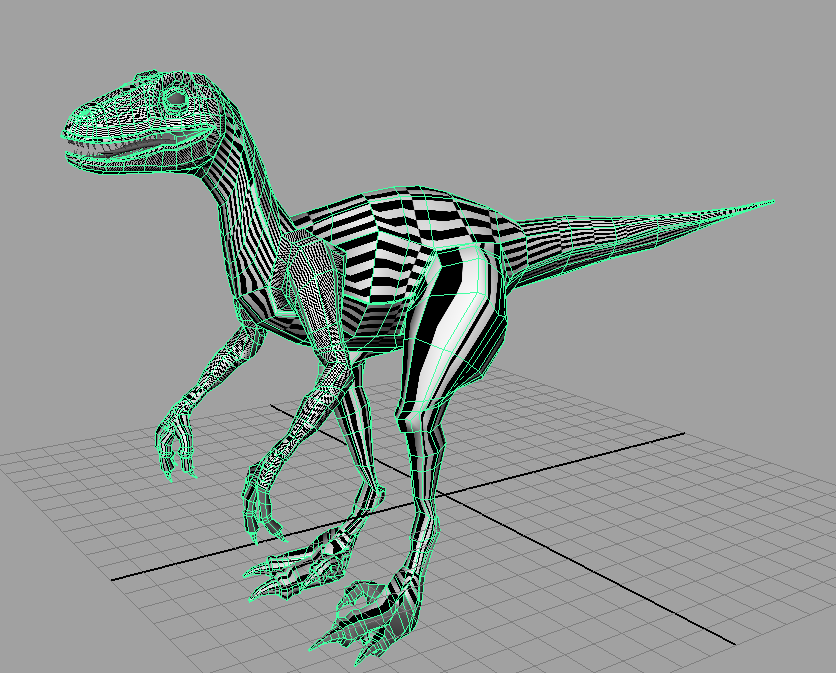
In order to monitor the process, people often use checkered patterns, cause it's easy to see distorted and stretched regions. Maya gives you a default UV map, but it's usually awful! Observe:
Ok, so it's not much to look at right now, let's start with the head and neck. Relatively easy to grab those faces and uncurl them as though they were cylinders. Here's the result of that:
The body comes next, working around the areas where the arms and legs come off. We can sew together the UVs at the junction between neck, body and tail so there's no seams there. We also scale the UVs so that the checkers appear all the same size.
Next up are the legs, which are a bit trickier, but after some tedious jigsaw work we get this... it's actually very akin to a jigsaw puzzle, but the computer will tell you whether two pieces connect and will connect them up for you... :
And... after much tedious clicking, voila! Ready for texturing, unless you like the checkered dino. It's probably evolutionarily adaptive if there's a herd of them. But as solitary hunters, I think a nice earthy tone with some striping would do nicely.
And if you want to know what the UVs look like, here's a couple final screenshots. I arranged them as they're located on the body and then cram them into a 0-1 U and 0-1 V space which we can start painting over.

Hope that was informative and interesting. I'll be working on some texturing today and my goal is to have it done by Wednesday I think. Thanks for reading!
Later,
Stuart
Anyway, on to the UV stuff. This is a bit of an abstract area, so I'll go through it with a few pictures (yay pics!). In 3D space, there are XYZ coordinates. Now, if you want to use photoshop or something to texture your grey model with detailed strokes, you can't use photoshop to paint in 3D space of course (*yes you can, CS4 introduced that...* *shhh, just ignore that* *ahem, go on*) Ok, so there is a different coordinate system called U and V that exist in 2D space. The tricky part is peeling apart your 3D model and flattening it out. It's not so hard to just rip bits off of your model (digitally speaking) and smash them into 2D. However, you don't want any overlapping bits, cause then if you paint in one spot over the UV map, it'll appear in two spots on the model in 3D, see?
Imagine peeling apart an orange. If you pulled off a whole bunch of pieces, you could flatten them out and paint over them, but once the peel is reassembled, you'd have many seams, which are hard to transition over with paint. So we want to avoid overlapping pieces, and minimize the seams. Great! But there's a third issue... (*groan*) If you look at a map of Canada, it often appears about the same size as the States or a bit bigger. But everyone knows how massively huge Canada is... so what's the deal? Well as the ancient Egyptians figured out, the earth is round and maps are flat (*ok, so maybe it wasn't them... who knows anyway*). There will be distortion in looking at a 2D texture of a 3D object and vice versa. So minimize distortion and seams, no overlapping bits. Off we go!!!
In order to monitor the process, people often use checkered patterns, cause it's easy to see distorted and stretched regions. Maya gives you a default UV map, but it's usually awful! Observe:
Ok, so it's not much to look at right now, let's start with the head and neck. Relatively easy to grab those faces and uncurl them as though they were cylinders. Here's the result of that:
The body comes next, working around the areas where the arms and legs come off. We can sew together the UVs at the junction between neck, body and tail so there's no seams there. We also scale the UVs so that the checkers appear all the same size.
Next up are the legs, which are a bit trickier, but after some tedious jigsaw work we get this... it's actually very akin to a jigsaw puzzle, but the computer will tell you whether two pieces connect and will connect them up for you... :
And... after much tedious clicking, voila! Ready for texturing, unless you like the checkered dino. It's probably evolutionarily adaptive if there's a herd of them. But as solitary hunters, I think a nice earthy tone with some striping would do nicely.
And if you want to know what the UVs look like, here's a couple final screenshots. I arranged them as they're located on the body and then cram them into a 0-1 U and 0-1 V space which we can start painting over.
Hope that was informative and interesting. I'll be working on some texturing today and my goal is to have it done by Wednesday I think. Thanks for reading!
Later,
Stuart
Saturday, March 27, 2010
Raptor modelling finished
I finished the raptor modelling this afternoon, save for the bonus lessons that talked about sculpting in Zbrush. I don't have zbrush, so I haven't watched them yet, but I might do that later, just following along and seeing how much applies to Mudbox.
Next up is the UV mapping, a whole separate course, and then Texturing in Maya and Photoshop which is a third course. Looking forward to both of those. Hope you like the final image here.
Thanks for reading,
Stuart
Next up is the UV mapping, a whole separate course, and then Texturing in Maya and Photoshop which is a third course. Looking forward to both of those. Hope you like the final image here.
Thanks for reading,
Stuart
Friday, March 26, 2010
Rawr
Worked on the head. Mouth still needs to be done and some other details, but getting pretty close! One thing I don't like about doing video tutorials is that I can't listen to music while I work. That's an incentive to do original work, I suppose.
Used the snipping tool in Win 7 to grab the screenshot. For some reason I was still using Alt+PrintScrn all this time... how outdated. Apparently there's some function on the mac that you can press that'll pop an image onto your desktop, like FN + F11 + 1 + Option. I need to bind a hotkey to bring up the snipping tool. I wonder if there already is one. Let's see... apparently not, though I just stuck Ctrl+F12 onto it. Whee. No option for the windows key in the dialogue. Lame. Ramble grumble.
Later,
Stuart
PS And apparently there's some Ugandans that have checked in! Welcome from across the globe! I do like my ClustrMaps. And welcome to the Russians and Americans too, always happy to have global visitors to my humble blog.
Used the snipping tool in Win 7 to grab the screenshot. For some reason I was still using Alt+PrintScrn all this time... how outdated. Apparently there's some function on the mac that you can press that'll pop an image onto your desktop, like FN + F11 + 1 + Option. I need to bind a hotkey to bring up the snipping tool. I wonder if there already is one. Let's see... apparently not, though I just stuck Ctrl+F12 onto it. Whee. No option for the windows key in the dialogue. Lame. Ramble grumble.
Later,
Stuart
PS And apparently there's some Ugandans that have checked in! Welcome from across the globe! I do like my ClustrMaps. And welcome to the Russians and Americans too, always happy to have global visitors to my humble blog.
Wednesday, March 24, 2010
Small raptor update
Got a bit further on the raptor, adding some definition to the arms, legs and body as well as just starting extruding parts of the head. Bit of an odd process so far with the head, but we'll see where it goes.
Had a fun class yesterday, making a collage over an old calendar landscape, adding elements that fit with the foreground, midground and background. Here's something you might not have thought about: typically things get lighter in value and less saturated, the further away they are. It's called aerial perspective, caused by particles/moisture in the air. Also learned how to do 3-point perspective, which was interesting, 2 points on the horizon and one point on a vertical line. Still don't know how to figure out where these vanishing points are in real life.
Hope your week is going well.
Later,
Stuart
Had a fun class yesterday, making a collage over an old calendar landscape, adding elements that fit with the foreground, midground and background. Here's something you might not have thought about: typically things get lighter in value and less saturated, the further away they are. It's called aerial perspective, caused by particles/moisture in the air. Also learned how to do 3-point perspective, which was interesting, 2 points on the horizon and one point on a vertical line. Still don't know how to figure out where these vanishing points are in real life.
Hope your week is going well.
Later,
Stuart
Monday, March 22, 2010
Blocked out raptor body
Got a good start on the velociraptor today. I think I like doing organic modelling, at least when there's good references and I have a good idea of how the body form is supposed to look. This is partly true for this project, but I can imagine getting OCD on muscle groups for projects of my own.
I remember back when I was playing around with Maya as a mild interest and I had a grand idea for making a dinosaur movie. I got a reference skeleton for a deinonychus, and began modelling. I think I spent about three hours on a single claw (which after all that I wasn't very happy with) and set that project aside. Good to see I can make a bit more progress with this now I that know some basic tools and techniques.
In other news, I spent some time with Daryl and worked out a pretty fun concept for the animation I'm planning on doing for genescreen. Won't spoil the idea yet, but I'll be sure to post updates on that as I get started. Still lots of concept work and pre-production to do. Even though I'd dearly love to just jump and start modelling, I know I'm going to have to do quite a lot of planning and some simple concept tests if this is going to work.
In yet other news, as March begins to come to a close, the book I was planning on reading, "This is Your Brain on Music" did not get read, but I did read a children's trilogy (in a loose sense of the word) by Lois Lowry, (i.e. The Giver, Gathering Blue, and Messenger); three stories of individuals discovering their respective purposes in a distopian society. Some interesting ideas, but I think I would have gotten into them more if I was younger (though I did read The Giver a couple times many years ago). And I've started "The English Patient" by Michael Ondaatje (sp?) for my March/April book. I enjoyed "In the Skin of Lion" by him, the 'prequel' (in a loose sense of the word) to this one.
It was pointed out to me that posts are better with pictures, so I'm going to try hard to include something with my posts from now on. Thanks for looking and reading!
Hope you had a good weekend,
Stuart
I remember back when I was playing around with Maya as a mild interest and I had a grand idea for making a dinosaur movie. I got a reference skeleton for a deinonychus, and began modelling. I think I spent about three hours on a single claw (which after all that I wasn't very happy with) and set that project aside. Good to see I can make a bit more progress with this now I that know some basic tools and techniques.
In other news, I spent some time with Daryl and worked out a pretty fun concept for the animation I'm planning on doing for genescreen. Won't spoil the idea yet, but I'll be sure to post updates on that as I get started. Still lots of concept work and pre-production to do. Even though I'd dearly love to just jump and start modelling, I know I'm going to have to do quite a lot of planning and some simple concept tests if this is going to work.
In yet other news, as March begins to come to a close, the book I was planning on reading, "This is Your Brain on Music" did not get read, but I did read a children's trilogy (in a loose sense of the word) by Lois Lowry, (i.e. The Giver, Gathering Blue, and Messenger); three stories of individuals discovering their respective purposes in a distopian society. Some interesting ideas, but I think I would have gotten into them more if I was younger (though I did read The Giver a couple times many years ago). And I've started "The English Patient" by Michael Ondaatje (sp?) for my March/April book. I enjoyed "In the Skin of Lion" by him, the 'prequel' (in a loose sense of the word) to this one.
It was pointed out to me that posts are better with pictures, so I'm going to try hard to include something with my posts from now on. Thanks for looking and reading!
Hope you had a good weekend,
Stuart
Thursday, March 18, 2010
Raptors and DNA (but not Jurrasic Park)
I've decided on the next project I'm going to do. It'll involve three different DT training kits, but they all use the same subject, a velociraptor. It'll go through some organic modelling, UV mapping, and texturing. I haven't done much organic modelling yet (other than delgo...) so should be informative, and I know very little about UV mapping, especially organic stuff, and texturing in photoshop using UV snapshots is a new technique to me as well. Should be fun. I'll post something as soon as I start (well, as soon as I've got something that is).
I've also gone through a couple smaller courses recently (Color theory, principles of graphic design) which complemented the class I'm taking right now nicely. And I finally finished up Intro to Rigging which was teeedious to get through. The Character Setup course was much more informative and easy to follow. So that's where I'm at right now. I'm sure by the time I finish this velociraptor, I'll be wanting to do something of my own that's original.
Luckily there's a video competition that's about to start that is right up my alley. Genescreenbc.com has a video competition that combines video (go figure) and genetics! So I'm really going to try to put something together for that. Kudos to one of my co-workers for pointing it out to me! And here's a question for you... what elements would you like to see in a nifty animated science video?
Later,
Stuart
I've also gone through a couple smaller courses recently (Color theory, principles of graphic design) which complemented the class I'm taking right now nicely. And I finally finished up Intro to Rigging which was teeedious to get through. The Character Setup course was much more informative and easy to follow. So that's where I'm at right now. I'm sure by the time I finish this velociraptor, I'll be wanting to do something of my own that's original.
Luckily there's a video competition that's about to start that is right up my alley. Genescreenbc.com has a video competition that combines video (go figure) and genetics! So I'm really going to try to put something together for that. Kudos to one of my co-workers for pointing it out to me! And here's a question for you... what elements would you like to see in a nifty animated science video?
Later,
Stuart
Thursday, March 11, 2010
Happy Birthday to Blog
So I didn't realize that this blog was a year old yet... but apparently I posted first on Feb 26th last year. Happy belated birthday to this anyway. I suppose I've learned a whole ton this year. Feel free to go back through the archive and see how hopeless I was back then... and then see how hopeless I am now. I just finished Intro to Modelling? Really? The road ahead is longer than the one behind.
So thanks again to the people that view this blog! Really keeps me moving forward. Oh, and feel free to comment on what your favorite post of the last year was!
Later,
Stuart
So thanks again to the people that view this blog! Really keeps me moving forward. Oh, and feel free to comment on what your favorite post of the last year was!
Later,
Stuart
Subscribe to:
Posts (Atom)